Cryptocurrency mining on iOS devices


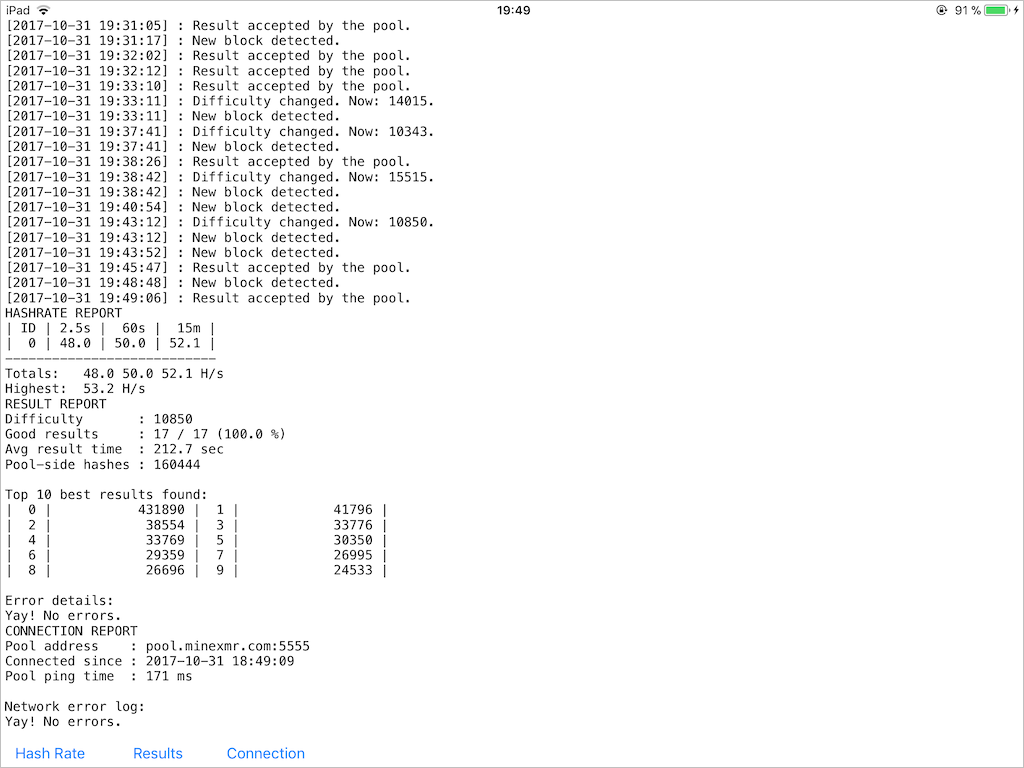
XMR-STAK-CPU running on iPad

Disclaimer

This post should not be treated as an advice to use iOS devices as a cryptocurrency mining machine. That can destroy the battery, fry the CPU/SoC, ruin the system’s responsiveness etc. This is a purely academic research driven by sheer curiosity.

Reasons

Since I got my hands on the latest iPad, I was eager to write something to check horsepower of that machine. Thanks to the recent bubble of cryptocurrencies prices, this ridiculous idea appeared. Of course, there’s no sense in trying to mine bitcoins or similar currencies since CPUs can’t compete with specialized solutions like ASICs in mining those. On the other hand, cryptocurrencies based on CryptoNote, like Monero(XMR ticker), have memory-bound properties which make them hard to crack on tiny dumb devices. That brings at least some amount of sense into solving these crypto puzzles on CPUs. I chose the XMR-STAK-CPU mining software, which is available in a source code, to try to run on iOS, first in a simulator and the on a real device.
As part of this porting experiment, I aimed to keep the original source code untouched and to use the files right out of the repository. Oddly enough, the endeavor was successful and within a few days, I got a complete solution. Challenges of porting and the outcome are described below.

Challenges

SSE vs. NEON
The source code of xmr-stak-cpu contains tons of SIMD instructions. Fortunately, there’re no inline assembler instructions and all calls are made through _mm_XXX intrinsics. That means it’s possible to mimic these calls with C-style functions and macros. The same applies to the data type definitions.
Thanks to the SSE2NEON project, the lion’s share of the work is already done and I basically needed only to properly fiddle with the source code. A trick with a precompiled header was used to do it: when the source was built for a real iOS device – SSE2 was mimicked with NEON and the original includes (<x86intrin.h>, <intrin.h>, <immintrin.h>) were suppressed by defining theirs include guards in advance. Nothing was substituted for iOS Simulator builds since it runs on an x86 machine and there’re no NEON instructions there.

But of course, that could not be absolutely smooth. A couple of x86 instructions was missing in SSE2NEON: _mm_prefetch, _mm_set_epi64x, _mm_cvtsi128_si64, _mm_aesenc_si128 and _mm_aeskeygenassist_si128.

_mm_set_epi64x and _mm_cvtsi128_si64 are trivial to implement on NEON with 1:1 mapping to SSE.

_mm_prefetch is a bit trickier since Intel and ARM have a different approach to controlling of the prefetch instruction and there’s no 1:1 mapping between those. I ended with the __builtin_prefetch(p) intrinsic to mimic _mm_prefetch, which is only a rough approximation.

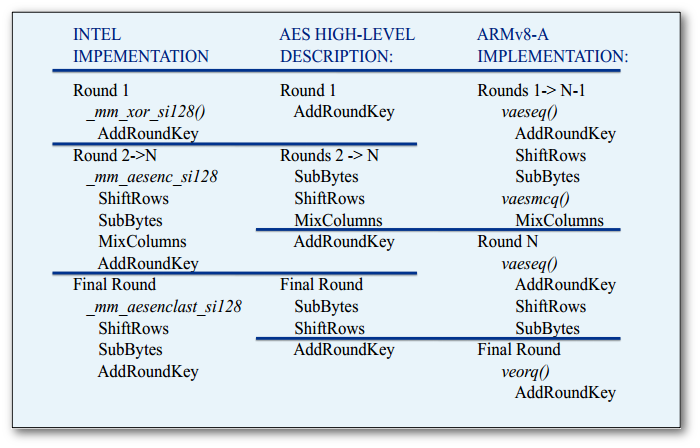
The most interesting instructions were the cryptographic _mm_aesenc_si128 and _mm_aeskeygenassist_si128. Intel and ARM have a different idea of how to split the AES encryption into a set of commands. Here’s a good visualization of the issue:

It requires a set of instructions to mimic _mm_aesenc_si128 on ARM. The trick is to eliminate the AddRoundKey stage of vaeseq_u8() by providing a key of zeros and to add the actual key in the end by manually doing an XOR operation. This yields 3 instructions instead of one on SSE, but semantics remains the same. Here’s the code:

static inline __attribute__((always_inline))
__m128i _mm_aesenc_si128( __m128i v, __m128i rkey )
{
    const __attribute__((aligned(16))) __m128i zero = {0};
    return veorq_u8( vaesmcq_u8( vaeseq_u8(v, zero) ), rkey );
}

AFAIK there’s no support for encryption keys expansion in NEON, so the _mm_aeskeygenassist_si128 had to be implemented manually. I used the software implementation from xmr-stack-cpu’s soft_aes.c and packed it to fake a single instruction call:

static inline __attribute__((always_inline))
__m128i _mm_aeskeygenassist_si128(__m128i key, const int rcon)
{
    static const uint8_t sbox[256] = {
    0x63, 0x7c, 0x77, 0x7b, 0xf2, 0x6b, 0x6f, 0xc5, 0x30, 0x01, 0x67, 0x2b, 0xfe, 0xd7, 0xab, 0x76,
    0xca, 0x82, 0xc9, 0x7d, 0xfa, 0x59, 0x47, 0xf0, 0xad, 0xd4, 0xa2, 0xaf, 0x9c, 0xa4, 0x72, 0xc0,
    0xb7, 0xfd, 0x93, 0x26, 0x36, 0x3f, 0xf7, 0xcc, 0x34, 0xa5, 0xe5, 0xf1, 0x71, 0xd8, 0x31, 0x15,
    0x04, 0xc7, 0x23, 0xc3, 0x18, 0x96, 0x05, 0x9a, 0x07, 0x12, 0x80, 0xe2, 0xeb, 0x27, 0xb2, 0x75,
    0x09, 0x83, 0x2c, 0x1a, 0x1b, 0x6e, 0x5a, 0xa0, 0x52, 0x3b, 0xd6, 0xb3, 0x29, 0xe3, 0x2f, 0x84,
    0x53, 0xd1, 0x00, 0xed, 0x20, 0xfc, 0xb1, 0x5b, 0x6a, 0xcb, 0xbe, 0x39, 0x4a, 0x4c, 0x58, 0xcf,
    0xd0, 0xef, 0xaa, 0xfb, 0x43, 0x4d, 0x33, 0x85, 0x45, 0xf9, 0x02, 0x7f, 0x50, 0x3c, 0x9f, 0xa8,
    0x51, 0xa3, 0x40, 0x8f, 0x92, 0x9d, 0x38, 0xf5, 0xbc, 0xb6, 0xda, 0x21, 0x10, 0xff, 0xf3, 0xd2,
    0xcd, 0x0c, 0x13, 0xec, 0x5f, 0x97, 0x44, 0x17, 0xc4, 0xa7, 0x7e, 0x3d, 0x64, 0x5d, 0x19, 0x73,
    0x60, 0x81, 0x4f, 0xdc, 0x22, 0x2a, 0x90, 0x88, 0x46, 0xee, 0xb8, 0x14, 0xde, 0x5e, 0x0b, 0xdb,
    0xe0, 0x32, 0x3a, 0x0a, 0x49, 0x06, 0x24, 0x5c, 0xc2, 0xd3, 0xac, 0x62, 0x91, 0x95, 0xe4, 0x79,
    0xe7, 0xc8, 0x37, 0x6d, 0x8d, 0xd5, 0x4e, 0xa9, 0x6c, 0x56, 0xf4, 0xea, 0x65, 0x7a, 0xae, 0x08,
    0xba, 0x78, 0x25, 0x2e, 0x1c, 0xa6, 0xb4, 0xc6, 0xe8, 0xdd, 0x74, 0x1f, 0x4b, 0xbd, 0x8b, 0x8a,
    0x70, 0x3e, 0xb5, 0x66, 0x48, 0x03, 0xf6, 0x0e, 0x61, 0x35, 0x57, 0xb9, 0x86, 0xc1, 0x1d, 0x9e,
    0xe1, 0xf8, 0x98, 0x11, 0x69, 0xd9, 0x8e, 0x94, 0x9b, 0x1e, 0x87, 0xe9, 0xce, 0x55, 0x28, 0xdf,
    0x8c, 0xa1, 0x89, 0x0d, 0xbf, 0xe6, 0x42, 0x68, 0x41, 0x99, 0x2d, 0x0f, 0xb0, 0x54, 0xbb, 0x16};
    uint32_t X1 = _mm_cvtsi128_si32(_mm_shuffle_epi32(key, 0x55));
    uint32_t X3 = _mm_cvtsi128_si32(_mm_shuffle_epi32(key, 0xFF));
    for( int i = 0; i < 4; ++i ) {
        ((uint8_t*)&X1)[i] = sbox[ ((uint8_t*)&X1)[i] ];
        ((uint8_t*)&X3)[i] = sbox[ ((uint8_t*)&X3)[i] ];
    }
    return _mm_set_epi32(((X3 >> 8) | (X3 << 24)) ^ rcon, X3, ((X1 >> 8) | (X1 << 24)) ^ rcon, X1);
}

cpuid
xmr-stack-cpu uses the cpuid command to determine whether SSE and AES instructions are supported on the CPU. The problem was that <cpuid.h> shipped with Xcode doesn’t have an include guard, so it’s not possible to suppress its inclusion as it was done with <x86intrin.h>. Instead, <cpuid.h> had to be faked entirely by fiddling with headers search paths. Here’s the fake header to make xmr-stack-cpu believe that ARM chip supports everything:

#pragma once
#include "TargetConditionals.h"
#if TARGET_OS_SIMULATOR
#define __cpuid_count(__level, __count, __eax, __ebx, __ecx, __edx) \
    __asm(" xchgq %%rbx,%q1\n" \
          " cpuid\n" \
          " xchgq %%rbx,%q1" \
        : "=a"(__eax), "=r" (__ebx), "=c"(__ecx), "=d"(__edx) \
        : "0"(__level), "2"(__count))
#else
static inline __attribute__((always_inline))
void __cpuid_count(uint32_t __level, int32_t __count,
                   int32_t &__eax, int32_t &__ebx, int32_t &__ecx, int32_t &__edx)
{
    __eax = __ebx = __ecx = __edx = -1;
}
#endif

stdout capture
xmr-stack-cpu is a console-based software and I wanted to keep that as is, regardless of what Apple thinks about stdout in iOS. A simple dup2 syscall does the job – stdout could be redirected into a pipe, while another end of that pipe is connected with some UI control like UITextView. Here’s the snippet:

let pipe = Pipe()
var fileHandle: FileHandle!
var source: DispatchSourceRead!

func setupStdout() {
    fileHandle = pipe.fileHandleForReading
    fflush(stdout)
    dup2(pipe.fileHandleForWriting.fileDescriptor, fileno(stdout))
    setvbuf(stdout, nil, _IONBF, 0)
    source = DispatchSource.makeReadSource(fileDescriptor: fileHandle.fileDescriptor,
                                           queue: DispatchQueue.global())
    source.setEventHandler {
        self.readStdout()
    };
    source.resume()
}

func readStdout() {
    let buffer = malloc(4096)!
    let read_ret = read(fileHandle.fileDescriptor, buffer, 4096)
    if read_ret > 0 {
        let data = UnsafeBufferPointer(start: buffer.assumingMemoryBound(to: UInt8.self),
                                       count: read_ret)
        if let str = String(bytes: data, encoding: String.Encoding.utf8) {
            DispatchQueue.main.async {
                self.acceptLog(str: str)
            }
        }
    }
    free(buffer)
 }

Unlimited execution in background
That’s what Apple doesn’t like at all and tries to prevent at any cost. Of course, that makes sense in a perspective of battery life, but when a device is connected to a power source these restrictions look ridiculous. After all, that’s my device and I want it to be able to perform any computations, no matter how time-consuming and complex they are. There’s no universal solution for this problem, but at least one particular combination worked for me on iOS11:
– Creation of a background task upon switching to background mode via UIApplication.shared.beginBackgroundTask and the consequent creation of next tasks in the expiration handler.
– Infinite looped playback of an empty sound file at the same time. I used this solution as a starting point and made a few performance-wise tweaks after.
This hack lets the application to run indefinitely long and prevents it from putting to sleep and closing its network connections. During my tests, it was absolutely fine to leave the miner app working for 12+ hours and that didn’t lead to any terminations or suspensions or connections droppings.

Results

I benchmarked the performance on three Macs from 2012 and two iOS devices. To be fair, all of these Macs have a “notebook-level” hardware and it wouldn’t be correct to make assumptions about “desktop-level” Intel CPUs based on the gathered data. The tests were run with low_power_mode=false and no_prefetch=true flags, during at least 15 minutes.
The results were surprising – despite the usage of an almost brute-force method of instructions translation and lack of any hardware-specific optimizations made for Apple CPUs, iPad 2017 showed pretty solid performance. A9 shows the same hashrate as Core i5-3427U, which itself cost $225 when it was introduced in 2012 (A9 was introduced in 2015) and has a TDP of 17W (A9 has about 4W).  This graph also clearly shows the memory-bound limitations of CryptoNote.

The source code and build instructions are available in this repository.

Abnormal programming at CppCon2017

During last CppCon, a set of C++ puzzles was presented within the SCM Challenge (thanks for an iPad BTW). While most of those puzzles were quite generic and simple, one puzzle did really stand out. The one I’m mentioning here was called “Don’t Repeat Yourself” and was introduced by Arthur O’Dwyer.

Here is problem statement:
Write a program that prints the numbers from 1 to N, then back down to 1, separated by whitespace. But Don’t Repeat Yourself: each word in your submitted source code must be unique! A “word” is defined as in Part 1. How large of an N can you achieve?

And that is the definition of a “word” from Part 1:
Write a function that returns true if every word in its input is unique. A “word” is defined as any maximal string of consecutive word characters, and a “word character” is defined as a digit, letter, or underscore. For example, the string “5+hello-world 0_9/a7” contains five words, all unique; so your function should return true. The string “abc+abc_+abc” contains three words, of which the first and last are both “abc”, so your function should return false.

This task, harmless at first sight, turns into a ridiculously hard riddle. “Uniqueness” means that it’s not possible to access any identifier – it can only be declared, but never touched again. The same applies to preprocessor statements, language keywords and so forth. Unfortunately, there’s no known “right” solution to this puzzle (at least for me). Arthur showed 3 possible solutions made by CppCon participants, including mine, during his lightning talk, but all those were hacks more or less. One exploited the trick with escape sequences in string literals, another used a plain assembled binary injected into the source code. Mine used the stack hack to get a read-write access to the function parameter.

The clean variant of my solution is shown below. It assumes libstdc++ environment and gcc compiler. Of course, there’s no compatibility with other compilers and/or standard libraries. A few notes on the solution:
– Optimization is turned off by a compiler-specific pragma to get access to the stack. Parameter passing would be optimized otherwise.
– User-defined literal is used to mimic the function syntax. Otherwise, it would not be possible to call the function.
– The function parameter N is accessed via stack frame address hack and via zero-sized alloca() hack.
– errno is used as another counter variable, thanks to the library-specific alias.

#include <iostream>
using namespace std;
__attribute__((optnone)) void operator "" _print( decltype(0ULL) )
{
    for(; errno <= ((uint64_t*)__builtin_alloca(0L))[3L];) 
        cerr << ++*__errno_location() << " ";
    while( ((int64_t*)__builtin_frame_address(0))[-1L] )
        cout << ((long*)alloca(0LL))[3]-- << " ";
}
int main()
{
    // print numbers up to 500 and back
    500_print;
}

Painless localization of bundles with Xcode

In Cocoa world, NSLocalizedString() is the “official” way to localize a user-facing string data. It has been around for many years, and most of the time this mechanism works pretty well. Even better, it’s possible to use the XLIFF file format throughout a localization process since the release of Xcode 6. The IDE is smart enough to gather string resources defined in source files and to expose them via XLIFF. This support from IDE and external tools makes the localization process mostly smooth for small projects.

The process gets more clumsy when custom tables (other than “Localizable.strings”) or frameworks come into play. At that moment a relatively slender
NSLocalizedString(@”String”, “comment”)
transforms into a
NSLocalizedStringFromTable(@”String”, “Custom”, “comment”)
or, even worse, into a
NSLocalizedStringFromTableInBundle(@”String”, “Localizable”, [NSBundle bundleForClass:[self class]], “comment”).
With this amount of boilerplate code, an SNR drops below 25% and such inclusions make it hard to reason about the functional logic.

Some projects mitigate this issue by introducing another macro on top of existing, but this approach disables an ability of Xcode to gather localizable strings from the source code. During the refactoring of Nimble Commander’s file operations subsystem (i.e. moving a bunch of code into a separate framework), I found it relatively easy to deal with this issue within the Objective-C++ world.

Since NSLocalizedString is a macro, nobody can stop from removing it away via simple #undef. Next, NSLocalizedString can be defined again as a regular function without any preprocessor magic:

// Internal.h
#pragma once
#undef NSLocalizedString
namespace project {
...
NSString *NSLocalizedString(NSString *_key, const char *_comment);
...
}

This small workaround preserves Xcode’s ability to find and extract localizable strings and is syntactically identical to the macro definition, i.e. no changes are required within an existing code. An implementation of redefined NSLocalizedString is pretty straightforward:

// Internal.mm
#include "Internal.h"
namespace project {
...
static NSBundle *Bundle()
{
  static const auto bundle_id = @"com.company.project.framework";
  static const auto bundle = [NSBundle bundleWithIdentifier:bundle_id];
  return bundle;
}

NSString *NSLocalizedString(NSString *_key, const char *_comment)
{
  return [Bundle() localizedStringForKey:_key value:@"" table:@"Localizable"];
}
...
}

Obviously, “Internal.h” must be included only inside the framework’s source code.


CoreFoundation and memory allocators – why bother?

Any seasoned C++ programmer knows that object allocation does cost CPU cycles, and may cost lots of them. The language itself provides various object allocation types. Such mess might surprise folks who use other user-friendlier languages, especially languages with a garbage collection. But that’s only the beginning. Any C++ Jedi knows about custom allocation strategies, such as memory pools,  buddy allocation, grow-only allocators, can write a generic-purpose memory allocator (probably quite a crappy one) and so forth.
Does it help? Sometimes usage of a custom allocator allows tuning up an application’s performance, by exploiting a specific knowledge about properties of the system.
Does it mean that it might be a good idea to write your own malloc() implementation? Absolutely not. It’s a good challenge for educational purposes, but almost never this will bring any performance benefits.

So what about Cocoa in this aspect?

On Foundation level, Objective-C once had some options to customize the allocation process via NSZone, but they were discarded upon a transition to the ARC. Swift, on the other hand, AFAIK doesn’t even pretend to provide any allocation options.

On CoreFoundation level, many APIs accept a pointer to a memory allocator (CFAllocatorRef) as the first parameter. kCFAllocatorDefault or NULL is passed to use the default allocator, i.e. CFAllocatorGetDefault(), i.e. kCFAllocatorSystemDefault in most cases. CoreFoundation also provides a set of APIs to manipulate the allocation process:
– CFAllocatorCreate
– CFAllocatorAllocate
– CFAllocatorReallocate
– CFAllocatorDeallocate
– CFAllocatorGetPreferredSizeForSize
– CFAllocatorGetContext
An overall mechanics around CFAllocatorRef is quite well documented and, even better, it’s always possible to take a look at the source code of CoreFoundation. So, it’s absolutely ok to use a custom memory allocator on the CoreFoundation level.

“What for?” might be a reasonable question here. Introducing any additional low-level components also implies some maintenance burden in the future, so there should be some heavy pros to bother with a custom memory allocation. Traditionally,  the Achilles’ heel of generic-purpose memory allocators is a dealing with many allocations and consequent deallocations of small amounts of memory. There’re plenty of optimization techniques developed for such tasks, so why not check it on Cocoa?

Suppose we want to spend as less time on memory allocation as possible. Nothing is faster than allocating memory on the stack, obviously. But there are some issues with a stack-based allocation:
• The stack is not limitless. A typical program, which does nothing tricky, is very unlikely to hit the stack limit, but that’s not an advice to carelessly use alloca() everywhere – it will strike back eventually.
• Deallocating a stack-based memory in an arbitrary order is painful and requires some time to manage. In a perfect world, however, it would be great to have an O(1) time complexity for both allocation and deallocation.
• All allocated objects must be freed before an escaping out of allocator’s visibility scope, otherwise, an access to the “leaked” object will lead to an undefined behavior.
To mitigate these issues, a compromise strategy exists:
• Use a stack memory when possible, fall back to a generic-purpose memory allocator otherwise.
• Do increase a stack pointer on allocations, don’t decrease it upon deallocations.
In such case, allocations will be blazingly fast most of the time, while it’s still possible to process requests for big memory chunks. As for the third issue, it falls onto the developer, since the memory allocator can only help with some diagnostic. It’s incredibly easy to write such memory allocator, main steps are described below.

The stack-based allocator is conceptually a classic C++ RAII object. It’s assumed that the client source code will be compiled as C++ or as Objective-C++. The only public method, apart from the constructor and the destructor, provides a CFAllocatorRef pointer to pass into CoreFoundation APIs. The internal state of the allocator consists of the stack itself, a stack pointer, two allocations counters for diagnostic purposes and the CFAllocatorRef pointer.

struct CFStackAllocator
{
  CFStackAllocator() noexcept;
  ~CFStackAllocator() noexcept;
  inline CFAllocatorRef Alloc() const noexcept { return m_Alloc; }
private:
... 
  static const int m_Size = 4096 - 16;
  char m_Buffer[m_Size];
  int m_Left;
  short m_StackObjects;
  short m_HeapObjects;
  const CFAllocatorRef m_Alloc;
};

To initialize the object, the constructor fills counters with defaults and creates a CFAllocatorRef frontend. Only two callbacks are required to build a working CFAllocatorRef: CFAllocatorAllocateCallBack and CFAllocatorDeallocateCallBack.

CFStackAllocator::CFStackAllocator() noexcept:
  m_Left(m_Size),
  m_StackObjects(0),
  m_HeapObjects(0),
  m_Alloc(Construct())
{}

CFAllocatorRef CFStackAllocator::Construct() noexcept
{
  CFAllocatorContext context = {
    0,
    this,
    nullptr,
    nullptr,
    nullptr,
    DoAlloc,
    nullptr,
    DoDealloc,
    nullptr
  };
  return CFAllocatorCreate(kCFAllocatorUseContext, &context);
}

To allocate a memory block, it’s only needed to check whether requested block could be placed in the stack buffer. In this case, the allocation process itself consists only of updating the free space counter. Otherwise, the allocation falls back to the generic malloc().

void *CFStackAllocator::DoAlloc
  (CFIndex _alloc_size, CFOptionFlags _hint, void *_info)
{
  auto me = (CFStackAllocator *)_info;
  if( _alloc_size <= me->m_Left ) {
    void *v = me->m_Buffer + m_Size - me->m_Left;
    me->m_Left -= _alloc_size;
    me->m_StackObjects++;
    return v;
  }
  else {
    me->m_HeapObjects++;
    return malloc(_alloc_size);
  }
}

To deallocate a previously allocated memory block, it’s only needed to check whether that allocation was dispatched to the malloc() and to call free() accordingly.

void CFStackAllocator::DoDealloc(void *_ptr, void *_info)
{
  auto me = (CFStackAllocator *)_info;
  if( _ptr < me->m_Buffer || _ptr >= me->m_Buffer + m_Size ) {
    free(_ptr);
    me->m_HeapObjects--;
  }
  else {
    me->m_StackObjects--;
  }
}

To measure the performance difference between a default Objective-C allocator, a default CoreFoundation allocator and the CFStackAllocator, the following task was executed:
Given N UTF-8 strings, calculate hash values of derived strings which are lowercase and normalized.

An Objective-C variant of the computation:

unsigned long Hash_NSString( const vector<string> &_data )
{
  unsigned long hash = 0;
  @autoreleasepool {
    for( const auto &s: _data ) {
      const auto nsstring = [[NSString alloc] initWithBytes:s.data()
                                                     length:s.length()
                                                   encoding:NSUTF8StringEncoding];
      hash += nsstring.lowercaseString.decomposedStringWithCanonicalMapping.hash;
    }
  }
  return hash;
}

A CoreFoundation counterpart of this task:

unsigned long Hash_CFString( const vector<string> &_data )
{
  unsigned long hash = 0;
  const auto locale = CFLocaleCopyCurrent();
  for( const auto &s: _data ) {
    const auto cfstring = CFStringCreateWithBytes(0,
                                                  (UInt8*)s.data(),
                                                  s.length(),
                                                  kCFStringEncodingUTF8,
                                                  false);
    const auto cfmstring = CFStringCreateMutableCopy(0, 0, cfstring);
    CFStringLowercase(cfmstring, locale);
    CFStringNormalize(cfmstring, kCFStringNormalizationFormD);
    hash += CFHash(cfmstring);
    CFRelease(cfmstring);
    CFRelease(cfstring);
  }
  CFRelease(locale);
  return hash;
}

A CoreFoundation counterpart using a stack-based memory allocation:

unsigned long Hash_CFString_SA( const vector<string> &_data )
{
  unsigned long hash = 0;
  const auto locale = CFLocaleCopyCurrent();
  for( const auto &s: _data ) {
    CFStackAllocator alloc;
    const auto cfstring = CFStringCreateWithBytes(alloc.Alloc(),
                                                  (UInt8*)s.data(),
                                                  s.length(),
                                                  kCFStringEncodingUTF8,
                                                  false);
    const auto cfmstring = CFStringCreateMutableCopy(alloc.Alloc(), 0, cfstring);
    CFStringLowercase(cfmstring, locale);
    CFStringNormalize(cfmstring, kCFStringNormalizationFormD);
    hash += CFHash(cfmstring);
    CFRelease(cfmstring);
    CFRelease(cfstring);
  }
  CFRelease(locale);
  return hash;
}

And here are the results. These functions were called with the same data set consisting of 1,000,000 randomly generated strings with varying lengths.

On the provided data sets range, the CoreFoundation+CFStackAllocator implementation variant is 20%-50% faster than the pure Objective-C implementation and is 7%-20% faster than the pure CoreFoundation implementation. It’s easy to observe that Δ between timings is almost constant and represents the difference between times spent in the management tasks. To be precise, the time spent in management tasks in the CoreFoundation+CFStackAllocator variant is ~800ms less than in the Objective-C variant and is ~270ms less than in the pure CoreFoundation variant. Divided by the strings amount, this Δ is ~800ns and ~270ns per string accordingly.
The stack-based memory allocation is a micro-optimization, of course, but it might be very useful in a time-critical execution path. The complete source code of the CFStackAllocator and of the benchmarking is available in this repository: https://github.com/mikekazakov/CFStackAllocator.