
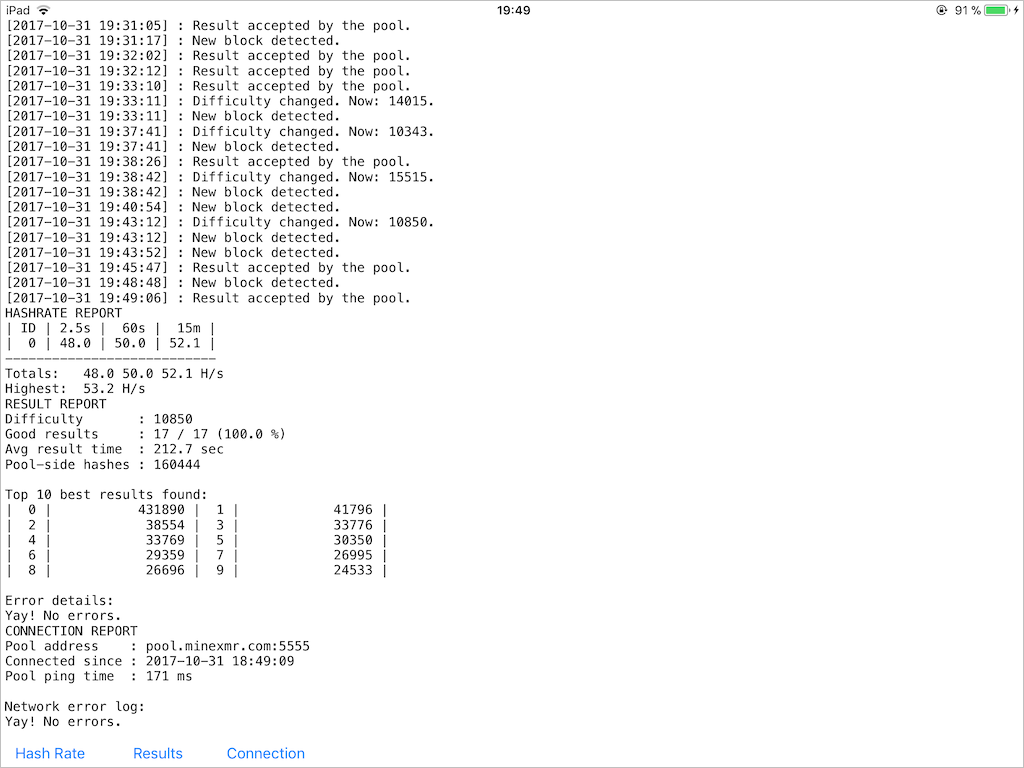
XMR-STAK-CPU running on iPad
Disclaimer
This post should not be treated as an advice to use iOS devices as a cryptocurrency mining machine. That can destroy the battery, fry the CPU/SoC, ruin the system’s responsiveness etc. This is a purely academic research driven by sheer curiosity.
Reasons
Since I got my hands on the latest iPad, I was eager to write something to check horsepower of that machine. Thanks to the recent bubble of cryptocurrencies prices, this ridiculous idea appeared. Of course, there’s no sense in trying to mine bitcoins or similar currencies since CPUs can’t compete with specialized solutions like ASICs in mining those. On the other hand, cryptocurrencies based on CryptoNote, like Monero(XMR ticker), have memory-bound properties which make them hard to crack on tiny dumb devices. That brings at least some amount of sense into solving these crypto puzzles on CPUs. I chose the XMR-STAK-CPU mining software, which is available in a source code, to try to run on iOS, first in a simulator and the on a real device.
As part of this porting experiment, I aimed to keep the original source code untouched and to use the files right out of the repository. Oddly enough, the endeavor was successful and within a few days, I got a complete solution. Challenges of porting and the outcome are described below.
Challenges
SSE vs. NEON
The source code of xmr-stak-cpu contains tons of SIMD instructions. Fortunately, there’re no inline assembler instructions and all calls are made through _mm_XXX intrinsics. That means it’s possible to mimic these calls with C-style functions and macros. The same applies to the data type definitions.
Thanks to the SSE2NEON project, the lion’s share of the work is already done and I basically needed only to properly fiddle with the source code. A trick with a precompiled header was used to do it: when the source was built for a real iOS device – SSE2 was mimicked with NEON and the original includes (<x86intrin.h>, <intrin.h>, <immintrin.h>) were suppressed by defining theirs include guards in advance. Nothing was substituted for iOS Simulator builds since it runs on an x86 machine and there’re no NEON instructions there.
But of course, that could not be absolutely smooth. A couple of x86 instructions was missing in SSE2NEON: _mm_prefetch, _mm_set_epi64x, _mm_cvtsi128_si64, _mm_aesenc_si128 and _mm_aeskeygenassist_si128.
_mm_set_epi64x and _mm_cvtsi128_si64 are trivial to implement on NEON with 1:1 mapping to SSE.
_mm_prefetch is a bit trickier since Intel and ARM have a different approach to controlling of the prefetch instruction and there’s no 1:1 mapping between those. I ended with the __builtin_prefetch(p) intrinsic to mimic _mm_prefetch, which is only a rough approximation.
The most interesting instructions were the cryptographic _mm_aesenc_si128 and _mm_aeskeygenassist_si128. Intel and ARM have a different idea of how to split the AES encryption into a set of commands. Here’s a good visualization of the issue:
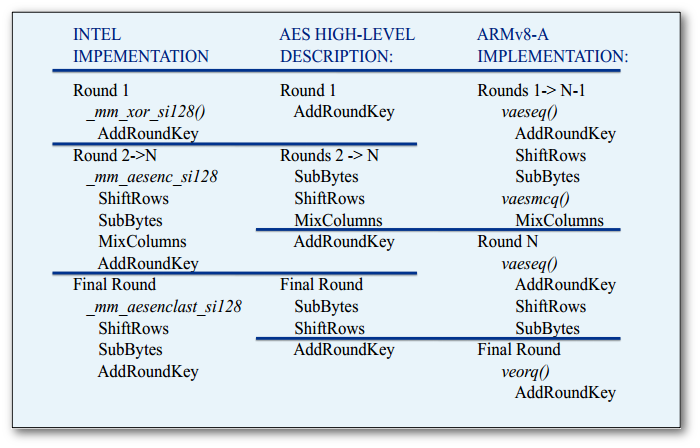
It requires a set of instructions to mimic _mm_aesenc_si128 on ARM. The trick is to eliminate the AddRoundKey stage of vaeseq_u8() by providing a key of zeros and to add the actual key in the end by manually doing an XOR operation. This yields 3 instructions instead of one on SSE, but semantics remains the same. Here’s the code:
static inline __attribute__((always_inline))
__m128i _mm_aesenc_si128( __m128i v, __m128i rkey )
{
    const __attribute__((aligned(16))) __m128i zero = {0};
    return veorq_u8( vaesmcq_u8( vaeseq_u8(v, zero) ), rkey );
}
AFAIK there’s no support for encryption keys expansion in NEON, so the _mm_aeskeygenassist_si128 had to be implemented manually. I used the software implementation from xmr-stack-cpu’s soft_aes.c and packed it to fake a single instruction call:
static inline __attribute__((always_inline))
__m128i _mm_aeskeygenassist_si128(__m128i key, const int rcon)
{
    static const uint8_t sbox[256] = {
    0x63, 0x7c, 0x77, 0x7b, 0xf2, 0x6b, 0x6f, 0xc5, 0x30, 0x01, 0x67, 0x2b, 0xfe, 0xd7, 0xab, 0x76,
    0xca, 0x82, 0xc9, 0x7d, 0xfa, 0x59, 0x47, 0xf0, 0xad, 0xd4, 0xa2, 0xaf, 0x9c, 0xa4, 0x72, 0xc0,
    0xb7, 0xfd, 0x93, 0x26, 0x36, 0x3f, 0xf7, 0xcc, 0x34, 0xa5, 0xe5, 0xf1, 0x71, 0xd8, 0x31, 0x15,
    0x04, 0xc7, 0x23, 0xc3, 0x18, 0x96, 0x05, 0x9a, 0x07, 0x12, 0x80, 0xe2, 0xeb, 0x27, 0xb2, 0x75,
    0x09, 0x83, 0x2c, 0x1a, 0x1b, 0x6e, 0x5a, 0xa0, 0x52, 0x3b, 0xd6, 0xb3, 0x29, 0xe3, 0x2f, 0x84,
    0x53, 0xd1, 0x00, 0xed, 0x20, 0xfc, 0xb1, 0x5b, 0x6a, 0xcb, 0xbe, 0x39, 0x4a, 0x4c, 0x58, 0xcf,
    0xd0, 0xef, 0xaa, 0xfb, 0x43, 0x4d, 0x33, 0x85, 0x45, 0xf9, 0x02, 0x7f, 0x50, 0x3c, 0x9f, 0xa8,
    0x51, 0xa3, 0x40, 0x8f, 0x92, 0x9d, 0x38, 0xf5, 0xbc, 0xb6, 0xda, 0x21, 0x10, 0xff, 0xf3, 0xd2,
    0xcd, 0x0c, 0x13, 0xec, 0x5f, 0x97, 0x44, 0x17, 0xc4, 0xa7, 0x7e, 0x3d, 0x64, 0x5d, 0x19, 0x73,
    0x60, 0x81, 0x4f, 0xdc, 0x22, 0x2a, 0x90, 0x88, 0x46, 0xee, 0xb8, 0x14, 0xde, 0x5e, 0x0b, 0xdb,
    0xe0, 0x32, 0x3a, 0x0a, 0x49, 0x06, 0x24, 0x5c, 0xc2, 0xd3, 0xac, 0x62, 0x91, 0x95, 0xe4, 0x79,
    0xe7, 0xc8, 0x37, 0x6d, 0x8d, 0xd5, 0x4e, 0xa9, 0x6c, 0x56, 0xf4, 0xea, 0x65, 0x7a, 0xae, 0x08,
    0xba, 0x78, 0x25, 0x2e, 0x1c, 0xa6, 0xb4, 0xc6, 0xe8, 0xdd, 0x74, 0x1f, 0x4b, 0xbd, 0x8b, 0x8a,
    0x70, 0x3e, 0xb5, 0x66, 0x48, 0x03, 0xf6, 0x0e, 0x61, 0x35, 0x57, 0xb9, 0x86, 0xc1, 0x1d, 0x9e,
    0xe1, 0xf8, 0x98, 0x11, 0x69, 0xd9, 0x8e, 0x94, 0x9b, 0x1e, 0x87, 0xe9, 0xce, 0x55, 0x28, 0xdf,
    0x8c, 0xa1, 0x89, 0x0d, 0xbf, 0xe6, 0x42, 0x68, 0x41, 0x99, 0x2d, 0x0f, 0xb0, 0x54, 0xbb, 0x16};
    uint32_t X1 = _mm_cvtsi128_si32(_mm_shuffle_epi32(key, 0x55));
    uint32_t X3 = _mm_cvtsi128_si32(_mm_shuffle_epi32(key, 0xFF));
    for( int i = 0; i < 4; ++i ) {
        ((uint8_t*)&X1)[i] = sbox[ ((uint8_t*)&X1)[i] ];
        ((uint8_t*)&X3)[i] = sbox[ ((uint8_t*)&X3)[i] ];
    }
    return _mm_set_epi32(((X3 >> 8) | (X3 << 24)) ^ rcon, X3, ((X1 >> 8) | (X1 << 24)) ^ rcon, X1);
}
cpuid
xmr-stack-cpu uses the cpuid command to determine whether SSE and AES instructions are supported on the CPU. The problem was that <cpuid.h> shipped with Xcode doesn’t have an include guard, so it’s not possible to suppress its inclusion as it was done with <x86intrin.h>. Instead, <cpuid.h> had to be faked entirely by fiddling with headers search paths. Here’s the fake header to make xmr-stack-cpu believe that ARM chip supports everything:
#pragma once
#include "TargetConditionals.h"
#if TARGET_OS_SIMULATOR
#define __cpuid_count(__level, __count, __eax, __ebx, __ecx, __edx) \
    __asm(" xchgq %%rbx,%q1\n" \
          " cpuid\n" \
          " xchgq %%rbx,%q1" \
        : "=a"(__eax), "=r" (__ebx), "=c"(__ecx), "=d"(__edx) \
        : "0"(__level), "2"(__count))
#else
static inline __attribute__((always_inline))
void __cpuid_count(uint32_t __level, int32_t __count,
                   int32_t &__eax, int32_t &__ebx, int32_t &__ecx, int32_t &__edx)
{
    __eax = __ebx = __ecx = __edx = -1;
}
#endif
stdout capture
xmr-stack-cpu is a console-based software and I wanted to keep that as is, regardless of what Apple thinks about stdout in iOS. A simple dup2 syscall does the job – stdout could be redirected into a pipe, while another end of that pipe is connected with some UI control like UITextView. Here’s the snippet:
let pipe = Pipe()
var fileHandle: FileHandle!
var source: DispatchSourceRead!

func setupStdout() {
    fileHandle = pipe.fileHandleForReading
    fflush(stdout)
    dup2(pipe.fileHandleForWriting.fileDescriptor, fileno(stdout))
    setvbuf(stdout, nil, _IONBF, 0)
    source = DispatchSource.makeReadSource(fileDescriptor: fileHandle.fileDescriptor,
                                           queue: DispatchQueue.global())
    source.setEventHandler {
        self.readStdout()
    };
    source.resume()
}

func readStdout() {
    let buffer = malloc(4096)!
    let read_ret = read(fileHandle.fileDescriptor, buffer, 4096)
    if read_ret > 0 {
        let data = UnsafeBufferPointer(start: buffer.assumingMemoryBound(to: UInt8.self),
                                       count: read_ret)
        if let str = String(bytes: data, encoding: String.Encoding.utf8) {
            DispatchQueue.main.async {
                self.acceptLog(str: str)
            }
        }
    }
    free(buffer)
 }
Unlimited execution in background
That’s what Apple doesn’t like at all and tries to prevent at any cost. Of course, that makes sense in a perspective of battery life, but when a device is connected to a power source these restrictions look ridiculous. After all, that’s my device and I want it to be able to perform any computations, no matter how time-consuming and complex they are. There’s no universal solution for this problem, but at least one particular combination worked for me on iOS11:
– Creation of a background task upon switching to background mode via UIApplication.shared.beginBackgroundTask and the consequent creation of next tasks in the expiration handler.
– Infinite looped playback of an empty sound file at the same time. I used this solution as a starting point and made a few performance-wise tweaks after.
This hack lets the application to run indefinitely long and prevents it from putting to sleep and closing its network connections. During my tests, it was absolutely fine to leave the miner app working for 12+ hours and that didn’t lead to any terminations or suspensions or connections droppings.
Results
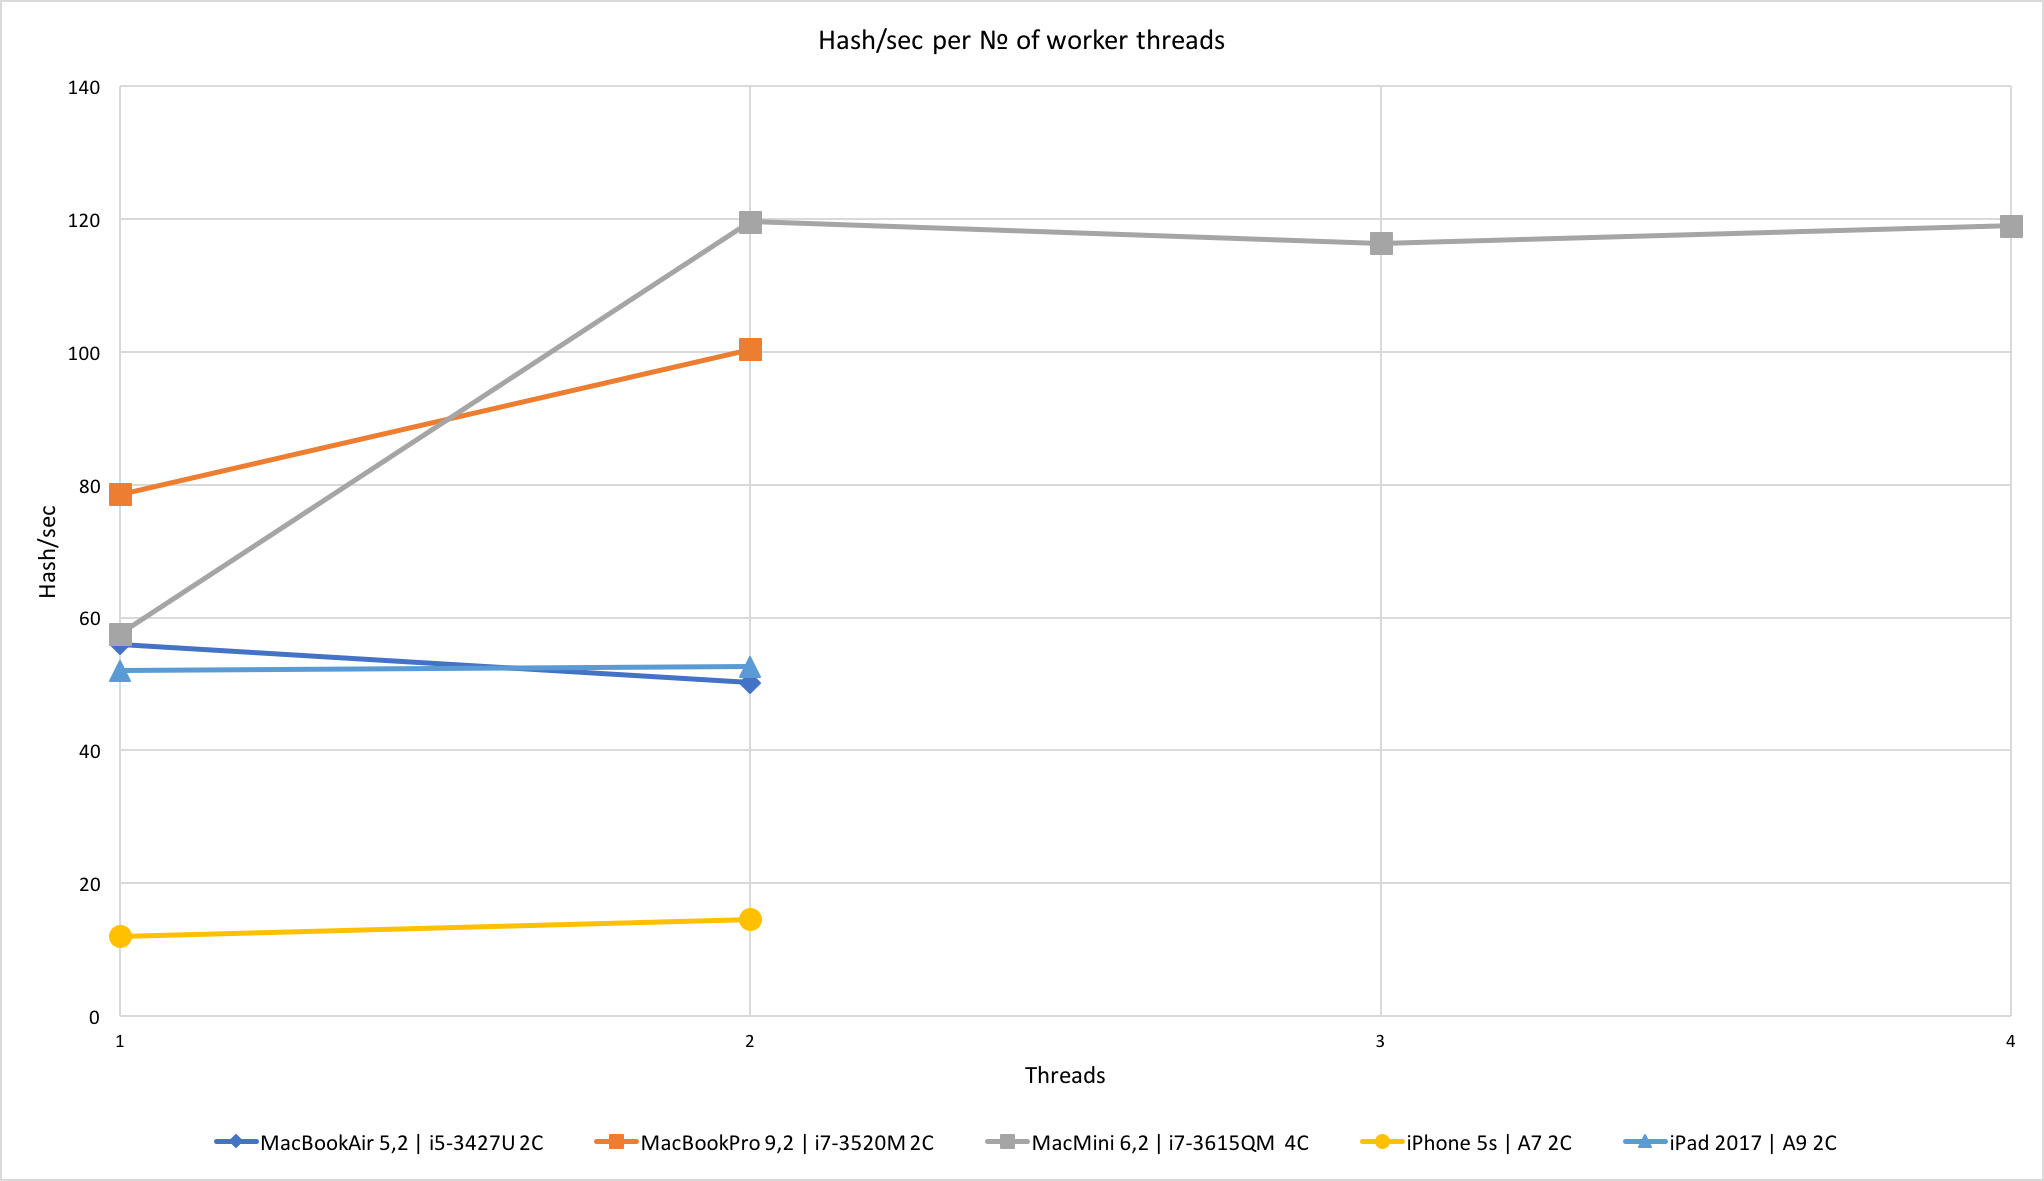
I benchmarked the performance on three Macs from 2012 and two iOS devices. To be fair, all of these Macs have a “notebook-level” hardware and it wouldn’t be correct to make assumptions about “desktop-level” Intel CPUs based on the gathered data. The tests were run with low_power_mode=false and no_prefetch=true flags, during at least 15 minutes.
The results were surprising – despite the usage of an almost brute-force method of instructions translation and lack of any hardware-specific optimizations made for Apple CPUs, iPad 2017 showed pretty solid performance. A9 shows the same hashrate as Core i5-3427U, which itself cost $225 when it was introduced in 2012 (A9 was introduced in 2015) and has a TDP of 17W (A9 has about 4W). This graph also clearly shows the memory-bound limitations of CryptoNote.
The source code and build instructions are available in this repository.
very cool thanks. Currently in the process of upgrading to high sierra so I can install xcode9 and have a play 🙂
any plans to take a stab at a poc for bitcoin gold that’s now live? cheers
Thanks, pal.
I believe nothing stops you from using a previous version of Xcode – iOS-related stuff is pretty simple here.
As for bitcoin gold – nope, no interest.
Thanks for the iOS port! Just wondering, any idea why i am getting lower performances on a A10X and A11 chip respectively? 10H/s is what i am getting
That’s very strange, those chips should have a shitload of computing power.
I haven’t played with those, but can assume that they should yield at least 70H/S.
First of all: check your build settings and ensure that the Release configuration is used when uploading to your iOS device.
Next come only wild guesses:
– what’s the thermal situation? The system can throttle CPU to prevent overheating.
– what’s the battery situation? Same logic applies here.
Oops, the release trick did it. Averaging 120-130H/s on both devices. I might want to take a look and see if its possible to utilise the GPU as well. Any special points to take note of when attempting to port the gpu version over? I believe the AMD one (OpenCL) might run
Holy cow, that’s a lot!
And you can also try playing with a number of threads – sample config runs only one.
Speaking of OpenCL – I believe it doesn’t utilize GPU on iOS.
Though I think it’s theoretically possible to write majority of routines using Metal compute shaders, but I’m unaware of any existing implementations.
Any chance of you (or anyone?) compiling and hosting this on a cydia repository? I’d love to mess with it but unable to compile it myself.
Does anybody use jailbreaking nowadays? 🙂
Anyway, this will require writing additional UI code for configuring info about a mining pool and a wallet.
Right now that doesn’t seem to be worth it.
Hi, I think I get the majority of this, it’s a great job, you surprised me man. The thing is that I’m not experienced with Apple devices and I would like to know how can I do this, I’ve only compiled the official version on Windows and Ubuntu, but never in a cell phone or tablet, and so, never on an iPad or iPhone.
If there is a post or site who has the information about how to do that , I’ll be glad to know it, or if it’s simple so someone can explain me how to do it, I’ll be even more grateful.
Very interesting, can you also make it buildable in Raspberry Pi with Armv8…
Thanks..
It’s trivial to do, but I don’t have the Raspberry Pi itself.
Want to send me one? 🙂
Hi,
Thanks for your work on this! But it seems to not be working now since the Monero fork (results get rejected by pool). Any chance you could please update to support the new algorithm? I’ve tried to integrate latest xmr-stak but apparently it is a bit beyond me…
Thank you!
I made necessary changes to the code, you can pull fresh sources and they should be good to go.
I’m getting MEMORY ALLOC FAILED: mmap failed on xmr-stak 2.4.3.
I don’t know how to configure large page support for iOS…
—-
On Linux you will need to configure large page support and increase your ulimit -l.
To set large page support, add the following lines to /etc/sysctl.conf:
vm.nr_hugepages=128
To increase the ulimit, add following lines to /etc/security/limits.conf:
* soft memlock 262144
* hard memlock 262144
You WILL need to log out and log back in for these settings to take affect on your user (no need to reboot, just relogin in your session).
You can also do it Windows-style and simply run-as-root, but this is NOT recommended for security reasons.
In addition to following methods:
void run_main_miner(const char *_config, const char *_pools, const char *_cpu);
void invoke_print_hash();
void invoke_print_results();
void invoke_print_connection();
Do you mind adding stop miner method?
I can’t see an interface for doing that without killing the entire application.
Got it built and working, thanks so much!
FYI, had to turn off “Target Membership” for Pods_xmr_stak_cpu_ios.framework
Thank you!
sorry i’m late to the game. i’ve successfully edited some of the source files and compiled. i’m getting about 50H/s on an iphone 6s. I believe this model has two cores, and i’d like to implement this. i tried editing the sample cpu.txt file, specifically by filling out the line for the second thread. re-compiling works fine, but the app crashes.
also, how much work do you think i’d need to put in to porting this to arm7 for an iphone 4 on 7.1.2?
iPhone4 has a 32-bit cpu, so it’s pointless even trying.
I’ve cloned your project and trying to pull recent submodule and POW updates, but I haven’t been able to compile it successfully yet. Have you tinkered with the new POW? My iPhone 6s was cranking b/w 45-51H/s on the pervious fork.