Action Shortcuts in Nimble Commander

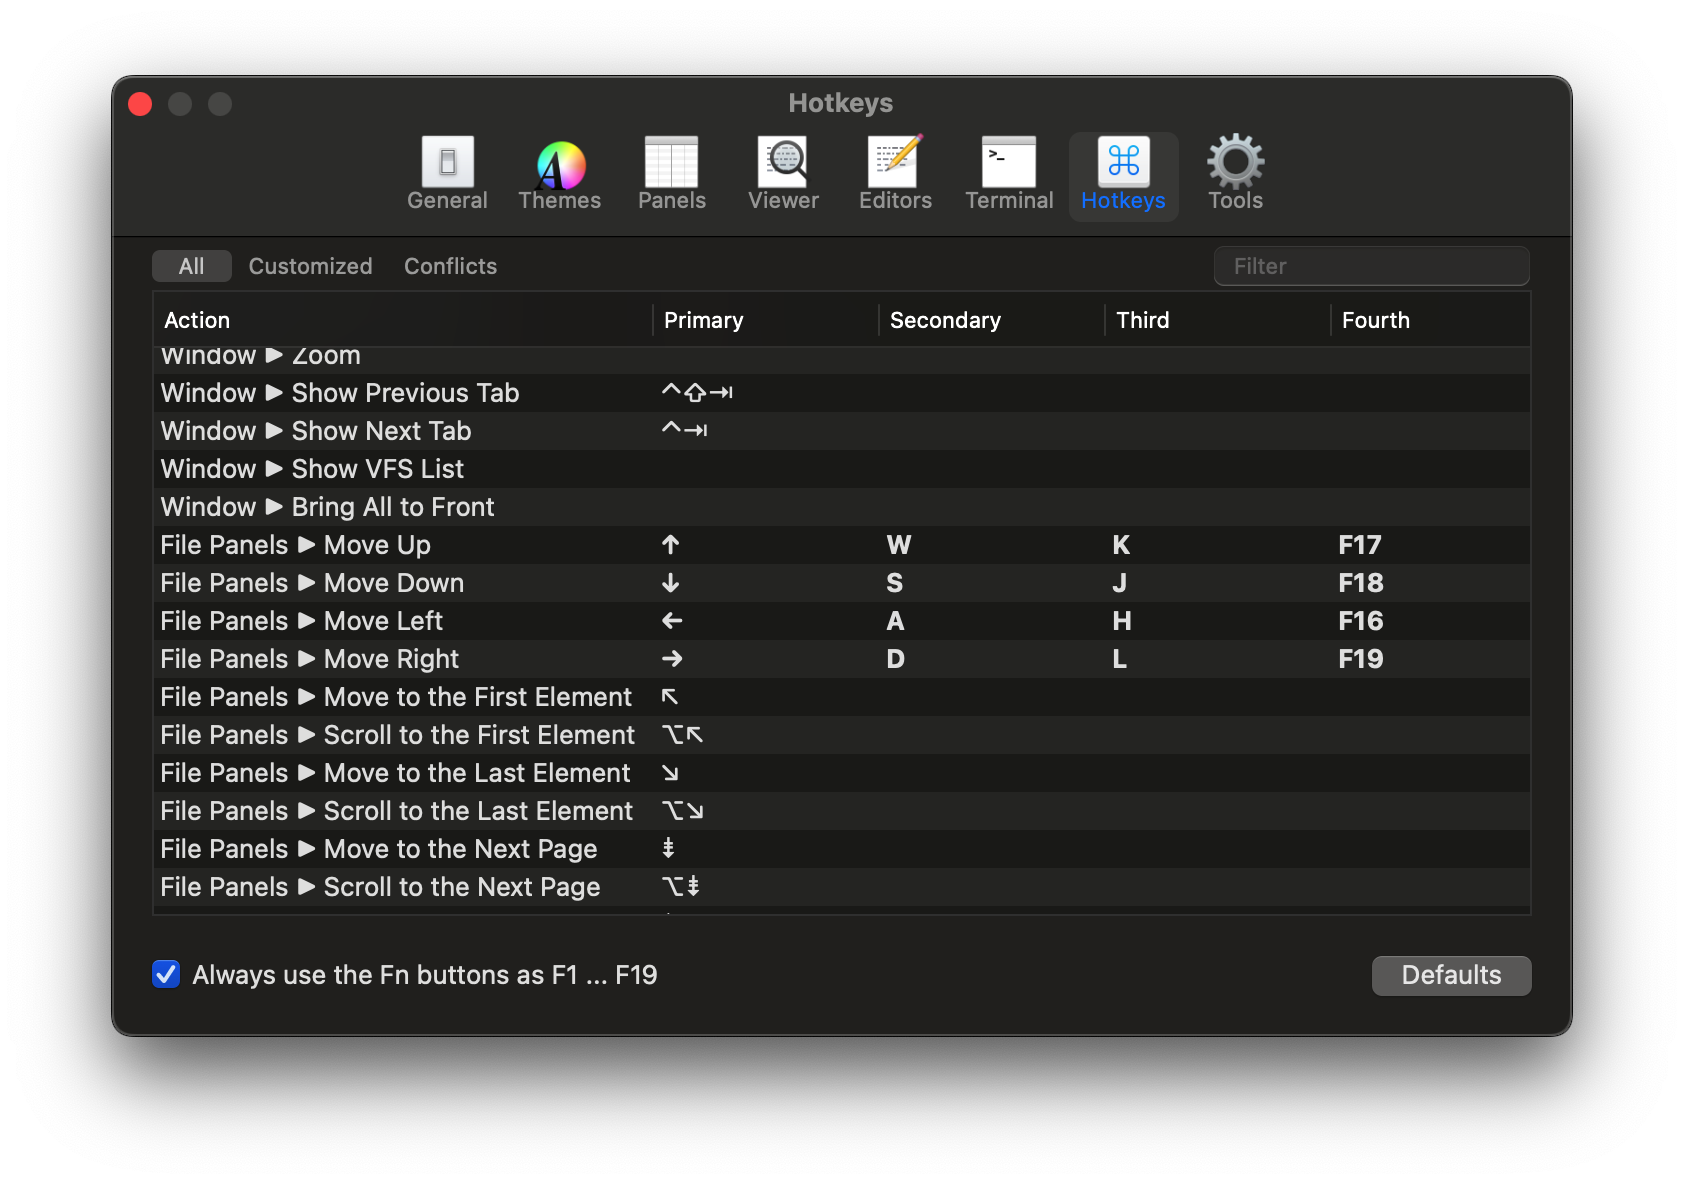
Over the New Year 2025 holiday period, I spent quite a few days implementing a feature in Nimble Commander that has been occasionally requested for many years. Customization of action shortcuts has been supported in the app since its early days, but this only allowed for a one-to-one relationship: an action could have a single shortcut.
What some users wanted was twofold:
  • The ability to set more than one shortcut per action.
  • The option to choose shortcuts that are normally not supported by macOS UX.
Adding this feature involved an interesting refactoring and touched many nitty-gritty details, so I thought it would be worth writing a brief reflection.
 
To start, let’s lay out the basics of how Nimble Commander handled shortcuts before.
Shortcuts can be assigned to three distinct types of actions, even though on the surface they appear similar:
  • Actions available through the standard fixed set of menu items.
    Processing the keyboard events for these shortcuts is done by macOS frameworks. This approach is standard and expected by users, plus it’s somewhat self-documenting — the menu items display their key equivalents next to the labels. The downside, often surprising to users, is that the menu system enforces strict limitations on which keys or key combinations can work as shortcuts. For instance, assigning a single letter without modifiers as a shortcut isn’t possible.
  • Context-based custom actions.
    An example of these might be actions in the file panels. For instance, when the Down key is pressed, a particular view in the responder chain recognizes the keypress as corresponding to the panel.move_down action and triggers the appropriate event. This logic is custom and implemented in methods like performKeyEquivalent: or keyDown:. Nimble Commander has full control over these events, with no restrictions on key assignments.
  • External tools.
    Shortcuts can also be set for external tools. In this case, the macOS menu system handles the heavy lifting — the corresponding dynamic menu item is assigned the shortcut selected for the external tool. The difference from standard application menu actions is that the list of external tools can be modified while the application is running. However, the same restrictions as menu-based actions apply here.
There are two main components in Nimble Commander that provide the machinery for shortcut customization:
  • ActionShortcut.
    This class describes a single keystroke. In practical terms, it encapsulates a combination of a character from the BMP (2 bytes) and a bitmask of key modifiers (1 byte). The class is very compact, occupying just 4 bytes (2 bytes for the character, 1 byte for the modifier bitmask, and 1 byte for padding).
  • ActionsShortcutsManager.
    This class is responsible for tracking which actions are associated with which shortcuts, including both default settings and custom overrides. It also provides a mechanism to automatically update external instances of ActionShortcut whenever the shortcut assigned to a corresponding action changes.
At first glance, the feature seems to simply involve allowing multiple shortcuts per action instead of just one. However, a naive implementation would be too inefficient. The issue lies with how context-based shortcut processing is implemented.
Previously, the processing worked as follows: each view in the hierarchy (e.g., file panel views, split views, tabbed holders, main window states, etc.) maintained a set of ActionShortcuts corresponding to the actions it handled. Whenever a keyDown: event occurred, the view hierarchy was traversed, with each view being asked, “Are you interested in this keystroke?” until one of the views responded affirmatively. Views supporting customizable shortcuts would then iterate through their set of shortcuts, asking each one, “Are you this keypress?“.
The runtime cost of this implementation scaled linearly with the number of customizable shortcuts. This was already somewhat inefficient, and converting each of these shortcuts into a dynamic container would have been completely impractical.
 
After staring at the code for a while, I realized the entire problem could be re-framed.
Instead of asking each shortcut, “Are you this keystroke?”, a new shortcut could be created directly from the keystroke itself. Once an incoming keystroke is expressed as a shortcut, it becomes possible to compare it directly with other shortcuts (a comparison of exactly 3 raw bytes).
Moreover, since shortcuts are just three bytes, they are trivially hashable, allowing all used shortcuts to be stored in a flat hash map. With such a map in place, it’s possible to perform an O(1) lookup for the incoming keystroke and answer the reverse question: “Which actions are triggered by this keystroke?”
This approach eliminates the need to maintain up-to-date, context-based shortcuts scattered throughout the UI code. Instead, the UI code can query the ActionsShortcutsManager to determine if the incoming keystroke corresponds to any specific action.
 
In practical terms, this functionality expansion involved:
Once this infrastructure was in place, adding support for multiple shortcuts for menu items was relatively straightforward:
  • Override the NSWindows’s performKeyEquivalent: method.
  • Find the first action that uses the incoming keypress as its shortcut, if it exists.
  • Check the index of the shortcut among the action’s shortcuts. If it’s the first one, ignore it and let NSMenu process the event.
  • Locate the menu item with the corresponding action tag and find its responder.
  • Validate the menu item if the responder provides the validation interface. Beep and return if validation fails.
  • Finally, ask the parent menu to perform the menu item’s action, including the visual blink that’s normally expected.
External tools still support only a single shortcut for now, though. Perhaps this is something to improve in future releases.

Enabling Swift in Nimble Commander

I’m quite interested in introducing Swift in Nimble Commander’s codebase and gradually replacing its UI components with code written in this language. Integrating Swift into this codebase is not straightforward, as there is almost no pure Objective-C code. Instead, all UI-level code is compiled as Objective-C++, which gives transparent access to components written in C++ and its standard library. Frankly, this is often much more efficient and pleasant to use than [Core]Foundation. The challenge before was that interoperability between C++ and Swift was essentially non-existent, and the only solution was to manually write bridges in plain C, which was a showstopper for me. Last year, with Xcode 15, some reasonable C++ <-> Swift interoperability finally became available, but it was missing crucial parts to be meaningfully used in an established codebase. However, with Xcode 16, it seems that the interop is now mature enough to be taken seriously. This week, I converted a small Objective-C component to Swift and submitted the change to Nimble Commander’s repository. It was a rather bumpy ride and took quite a few hours to iron out the problems, so I decided to write down my notes to help someone else spare a few brain cells while going through a similar journey.

The start was promising: enable ObjC++ interop (SWIFT_OBJC_INTEROP_MODE=objcxx), add a Swift file, and Xcode automatically enables Clang modules and creates a dummy bridging header. I had to tweak some C++ code with SWIFT_UNSAFE_REFERENCE to allow the Swift compiler to import the required type, but after that, the setup worked like a charm – the Objective-C++ side created a view now implemented in Swift, and the Swift side seamlessly accessed the component written in [Objective]C++. All of this was fully supported by Xcode: navigation, auto-completion—it all worked! Well, until it didn’t. Trivial functions, like printing “Hello, World!” worked fine, but the actual UI component re-written in Swift greeted me with a crash:

Nimble Commander`@objc PanelListViewTableHeaderCell.init(textCell:):
    0x10128ed74 <+0>:   sub    sp, sp, #0x50
    0x10128ed78 <+4>:   stp    x20, x19, [sp, #0x30]
    0x10128ed7c <+8>:   stp    x29, x30, [sp, #0x40]
    0x10128ed80 <+12>:  add    x29, sp, #0x40
    0x10128ed84 <+16>:  str    x0, [sp, #0x10]
    0x10128ed88 <+20>:  str    x2, [sp, #0x18]
    0x10128ed8c <+24>:  mov    x0, #0x0                  ; =0
    0x10128ed90 <+28>:  bl     0x10149cf84               ; symbol stub for: type metadata accessor for Swift.MainActor
->  0x10128ed94 <+32>:  mov    x20, x0
    0x10128ed98 <+36>:  str    x20, [sp, #0x8]
  ...

This left me quite puzzled—the Swift runtime was clearly loaded, as I could write a function using its standard library, and it was executed correctly when called from the C++ side. Yet the UI code simply refused to work, with parts of it clearly not being loaded—the pointers to the functions were NULL. Normally, I’d expect a runtime to either work correctly or fail entirely with a load-time error, but this was something new. As I don’t have much (or frankly, any) reasonable understanding of Swift’s runtime machinery under the hood, I tried searching online for any answers related to these symptoms and found essentially none. It’s not the kind of experience one would expect from a user-friendly language.

While searching for what other projects do, I stumbled upon a suspicious libswift_Concurrency.dylib located in the Frameworks directory, which gave me a hint—the actors model is related to concurrency, and the presence of this specific library couldn’t be a coincidence. So, out of desperation and curiosity, I blindly copied this library into Nimble Commander’s own Frameworks directory, and lo and behold—it finally worked! There is an option to make Xcode copy this library automatically: ALWAYS_EMBED_SWIFT_STANDARD_LIBRARIES. Another piece of the puzzle was that my @rpath only contained @executable_path/../Frameworks when it should have also included /usr/lib/swift. With these changes, Nimble Commander can now run correctly on macOS 10.15 through macOS 15.

With that done and the actual application built, it was time to tackle the tooling around the project. While Xcode’s toolchain is used to compile Nimble Commander, a separate LLVM installation from Homebrew is used for linting. That’s because Xcode doesn’t include eitherclang-format or clang-tidy (seriously, weird!). Since Apple ships a modified toolchain, consuming the same source code with an external toolchain can be rather problematic. I had to make the following changes to get clang-tidy to pass again after integrating the Swift source:

  • Disable the explicit-specialization-storage-class diagnostic, as the automatically generated bridging code from the Swift compiler seems to contain incorrect declarations.
  • Disable Clang modules by manually removing the -fmodules and -fmodules-cache-path= flags from the response files.
  • Remove framework imports (e.g., @import AppKit;) from the automatically generated bridging headers.
  • Add the paths to the Swift toolchain to the project’s search paths, i.e., $(TOOLCHAIN_DIR)/usr/lib/swift and $(TOOLCHAIN_DIR)/usr/include.
  • Explicitly include the Swift interop machinery before including the bridging header, i.e., #include <swiftToCxx/_SwiftCxxInteroperability.h>.

Such a number of hacks is unfortunate, and I hope to gradually make it easier to maintain.

This concludes the bumpy road to making Swift usable in Nimble Commander, though I’m sure more active use of the language will reveal other rough edges—no interop is seamless.

Bare web experiment

Introduction
I have a complicated relationship with website-related technologies. Previously I occasionally had to hack around with various web software, so I got some understanding of how different components work and interact with each other, but generally that’s something I’d prefer to not touch at all. Fiddling with bits & bytes and staring at assembly listings is much closed to me. Unfortunately sometimes one has to deal with it, for instance when developing a software product. In my case, it was Nimble Commander – this app needed at least some presence on the Internet. App Store won’t even accept an application without URLs of general product info, a support page, and a privacy policy page. A combination of NIH syndrome and a finance model of the project left outsourcing this task out of the question, so I had to pick my poison.

The intention was to find a simple WYSIWYG design system that would allow to slam together some content, export it as plain HTML files and then upload them to a server. For such a simple website nothing else was required. However, as it turned out in 2013, this niche was already dead and everything moved into CMS-style systems with backend programming languages, databases, and other cruft. One semi-obvious choice from Apple was its software for simple web design called iWeb. It was already outdated, but seemed to be decent enough for my needs. And so it worked for some time until its age became clear and I had to find something else. After some research, perhaps carried out incompetently, the verdict was to “just use WordPress and don’t reinvent the wheel”. The idea was appealing – a WYSIWYG editor plus a range of various visual themes (both free and paid) with an ability to plug additional components on top. And, when really needed, to fine-tune elements via a custom CSS as a cherry on the cake. Sounds awesome, right?

Not exactly. As it turned out, the built-in flexibility wasn’t that high and the design involved quite a lot of CSS hammering. WordPress was slow as hell and needed echelons of minifiers and caches. The HTML files spat out of the system was an incomprehensible pile of <div>s which made a web browser choke. And, on top of all, at some point, I discovered that the theme referenced some external resources via hardcoded “http://..” paths somewhere deep in its guts, which prevented me from making the website accessible via https. Not that encryption bothered me at all – who really cares about the fact that some person visited a website of a dual-pane file manager for Mac? But in 2018 web-browsers ignited a crusade against non-encrypted internet traffic and Chrome, for instance, started to happily print “not secure” next to the domain name. It was clear that somehow the website had to be moved to https.

There were basically two ways to get there – either hack the existing WordPress instance even further or deploy something fresh. The first option was doable, but was also disgustingly boring and would leave me with even more hacks to maintain. The latter was more time-consuming but at least would provide some new knowledge and entertain a bit.

It should be mentioned that IMHO the current state of the software industry could be fairly described as “dumpster fire” and manifests like this do resonate with me. Having started programming with 8-bit Z80, I’m often quite baffled with how inefficient a certain piece of software must be to perform so slowly on modern hardware. Looking critically at this website, it also appeared to be an over-engineered monstrosity for the tasks it performed. Simplified enough, the website looked like this: MySQL ↔ WordPress(PHP framework, 3rd pty theme, custom CSS hacks) ↔ Minifiers ↔ Caches ↔ Apache ↔ Internet. Since the site contained only ~5 webpages that weren’t changed often, I wondered – why not ditch this cruft altogether and write these pages manually in raw HTML+CSS? Then maybe I could serve 5 static html files without talking to a freaking DATABASE. Surely this area is far away from my usual system programming, but it shouldn’t be that hard. So I decided to conduct an experiment – to rewrite everything from scratch and to measure both how much effort it requires and how much faster the website could be if implemented this way.

Experience
What firstly strikes out is how smooth the web development is. When dealing with C++ it sometimes takes literally hours to just compile the project before you can run anything. Being able to hit Cmd+S in one window and Cmd+R in another to get feedback without a delay does feel like a bliss. When there’s almost no experience in the field (like my case), such frictionless makes the learning process very comfortable.

The combination of HTML5 with CSS3 feels incredibly powerful and intuitive in most cases. There were many instances when I couldn’t believe it – “is that SO easy?”. Perhaps the only case which caused hiccups and had several iterations was the image “gallery”. The problem was to make it lazy loading and somewhat responsive while keeping everything as simple as possible. In the end, the gallery was implemented in ~20 lines of JS code and that’s the only JS code these pages have now.

One especially amusing detail was that nowadays it’s often being recommended to combine images into large “sprite sheets“. Haha, with a gamedev background this does immediately ring a bell, though we tended to call them “texture atlases” instead. Good old “trading latency for bandwidth”. Well, that was a no-brainer – easy to implement and provides measurable speed improvement. With this trick, the front page requires only 4 resources to display – an HTML document, a CSS stylesheet, and two images.

It’s hard to tell exactly how much time this rewrite took. The repository with the source files contains 45 commits over three weeks. Assuming the average time spent per day was about 1 hour, this gives a total of ~21 hours or around three full working days. That sounds about right.

In the end, I’ve got something very close to the original design on WordPress, but an order of magnitude simpler and faster at the same time. The result is ~1300LoC in HTML and ~600LoC in CSS.

Data data data
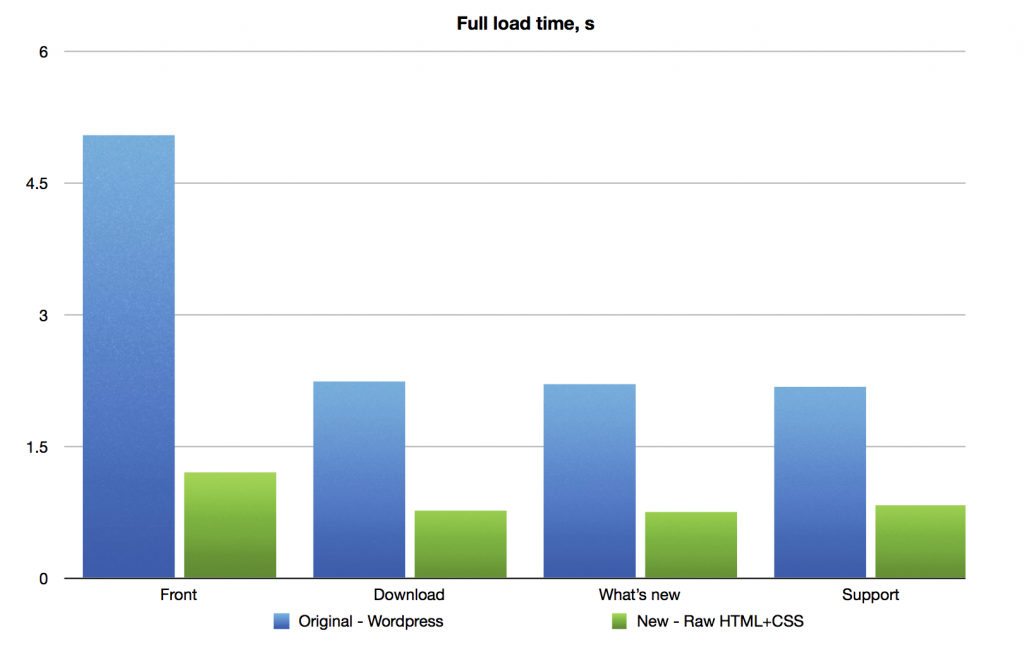
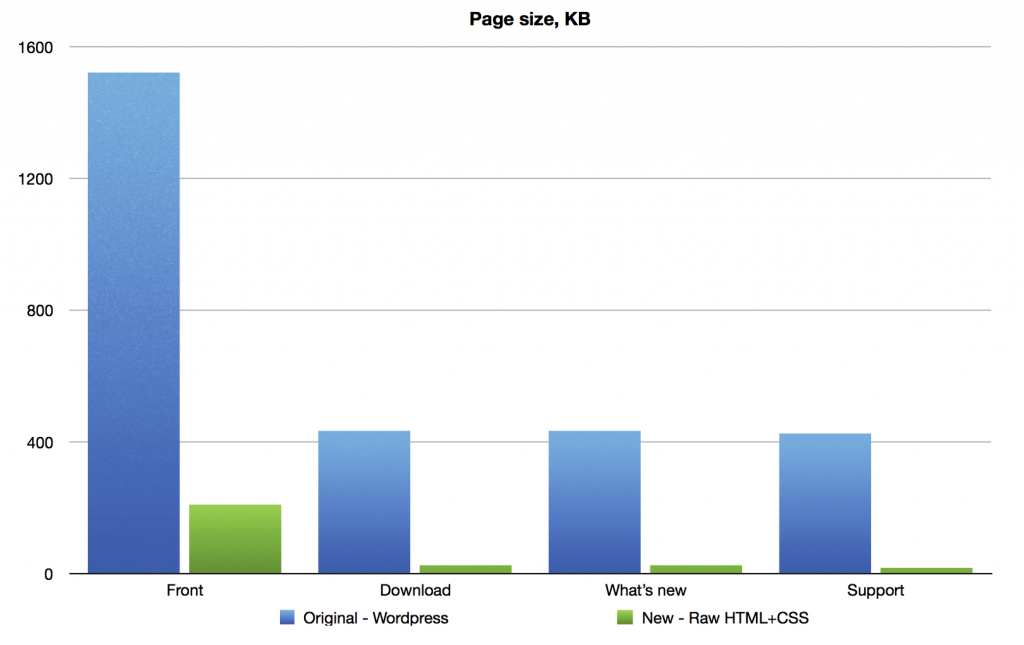
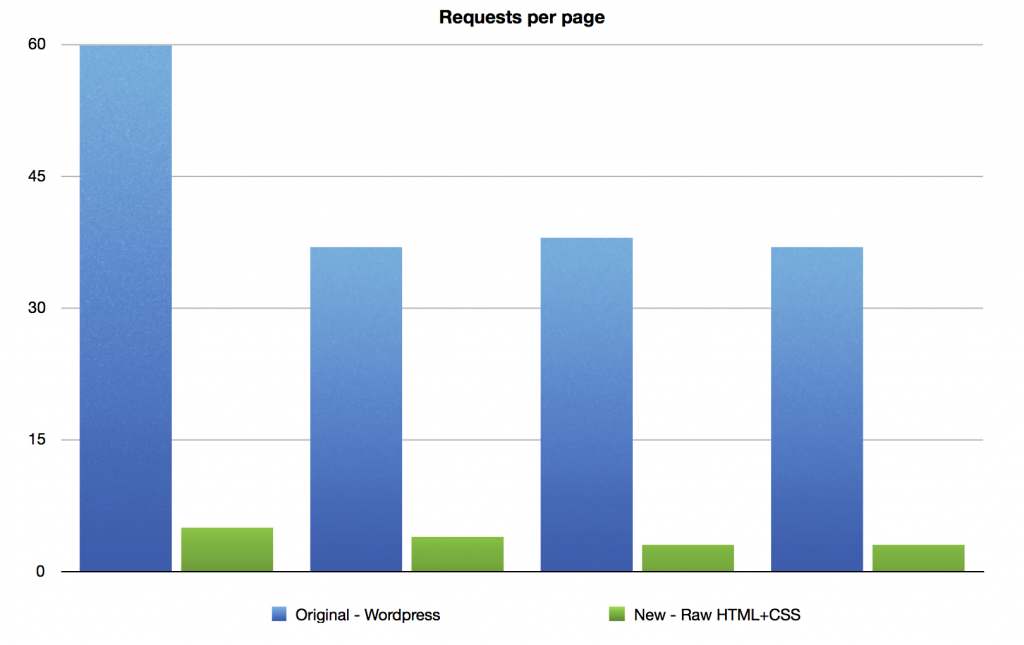
The graphs below show the performance characteristics when accessing the website from London, i.e. doing round trips across Atlantic (the server is located in the NY area). In short: the front page now loads ~4X faster, downloads ~7X fewer bytes and performs 12X fewer requests. To be precise though, it’s kind of comparing apples to oranges, since the original WordPress served unencrypted HTTP, whiles the rewritten site uses HTTPS,  which is more complex and requires handshaking, i.e the difference is actually even higher.

Hacking NSMenu keyboard navigation

AppKit’s menu subsystem is perhaps one of the most rigid and monolithic components in Cocoa. While it has a quite clear API, it contradicts with many idioms assumed in Cocoa, especially regarding customization support.

NSMenu subsystem provides, basically, two major customization points:

  • You can set your NSMenuDelegate implementation to update a structure of a specific menu instance. All NSMenuDelegate’s hooks are called before the menu is displayed.
  • You can put a custom view inside some NSMenuItem element to present a non-regular or an area-specific type of information. Microsoft Office for Mac, for example, has loads of such custom menu elements.

Apart from these points, you can’t control the menu’s behavior. Apparently, there’re some good reasons for that rigidity. A lot of under-the-hood work is done without even bothering on the app side, for instance: a Help->Search functionality triggered via Cmd+Shift+? hotkey. Or, generally speaking, it’s an example of a principle of least user astonishment in action.

What if, however, you want to slightly alter a default routine of input processing? The universal answer is – “then go and write your own implementation from the scratch”. This WWDC session contains more details: “Key Event Handling in Cocoa Applications“. Of course, writing an additional UI component with several KSLoCs might be an entertaining adventure, but polishing every detail of such generic metaphor can easily eat up weeks of work. And, it turns out, usually, there are more important tasks to do.

In my specific case, I wanted to optimize a keyboard navigation of one particular UX pattern in Nimble Commander. It provides hotkeys to show popup menus with various places to navigate go, like favorite locations, mounted volumes, network connections etc. After such popup menu has been shown, a user can choose an appropriate location via arrows keys or via mouse. NC also sets up hotkeys for the first 12 elements: [0, 1, …, 0, -, =]. So, for short lists everything is fine, and a required location can be chosen with two keystrokes – first to pop up a menu and second to trigger a menu item. Longer lists, however, can become hard to navigate, since a required item can be accessed only with key arrows. Yes, there’s some basic letter-based navigation implemented in menus, but it’s absolutely rudimentary and won’t help much. What I wanted was plain and simple – to drop a few letters in the menu and to show only items which contain this substring in their titles. Something similar to this:

No googling gave me any hints on possible approaches to intercepting of NSMenu input. Cocoa’s menu subsystem doesn’t use a regular NSWindow/NSView event routing, so usual hooks can’t be applied in this situation. [NSEvent addLocalMonitorForEventsMatchingMask: handler:] doesn’t do a thing – there’s simply no NSEvent object to process. Perhaps [NSEvent addGlobalMonitorForEventsMatchingMask: handler:] could work, but it’s too heavy to use in a mere UI element.
What else? Anyone who debugged their code after it was called by a menu item, might have noticed that a call stack was full of identifiers containing a word “Carbon”. While a majority of Carbon API was marked as “deprecated” years ago, the menu subsystem still heavily relies on that code.
Well, that’s something at least. Luckily, an event-processing part of Carbon is still available and even wasn’t marked as “deprecated”.

So, with that tested and confirmed, it’s possible to switch to an actual “hack” implementation. Here’re the steps to intercept an incoming NSMenu event:
1. Make a custom menu.
2. Put there an element with a custom view inside.
3. Override the [NSView viewDidMoveToWindow] method on that custom view.
4. Retrieve current Carbon event dispatcher via GetEventDispatcherTarget().
5. Install a new event handler for an appropriate event kind via InstallEventHandler().

Here’s the code snippet (Objective-C++):

- (void) viewDidMoveToWindow
{
  [super viewDidMoveToWindow];

  if( m_EventHandler != nullptr ) {
    RemoveEventHandler(m_EventHandler);
    m_EventHandler = nullptr;
  }

  if( const auto window = self.window ) {
    if( ![window.className isEqualToString:@"NSCarbonMenuWindow"] ) {
      NSLog(@"Sorry, but MGKMenuWithFilter was designed to work with NSCarbonMenuWindow.");
      return;
    }
 
    const auto dispatcher = GetEventDispatcherTarget();
    if( !dispatcher ) {
      NSLog(@"GetEventDispatcherTarget() failed");
      return;
    }

    EventTypeSpec evts[2];
    evts[0].eventClass = kEventClassKeyboard;
    evts[0].eventKind = kEventRawKeyDown;
    evts[1].eventClass = kEventClassKeyboard;
    evts[1].eventKind = kEventRawKeyRepeat;
    const auto result = InstallEventHandler(dispatcher,
                                            CarbonCallback,
                                            2,
                                            &evts[0],
                                            (__bridge void*)self,
                                            &m_EventHandler);
    if( result != noErr ) {
      NSLog(@"InstallEventHandler() failed");
    }
  }
}

At this point, most of the keyboard events are passed to the custom Carbon callback, except for previously set key equivalents. The callback can convey these events onto the custom processing, and if an event wasn’t processed there, it can be sent back to default route:

static OSStatus CarbonCallback(EventHandlerCallRef _handler,
                               EventRef _event,
                               void *_user_data)
{
  if( !_event || !_user_data )
    return noErr;

  const auto menu_item = (__bridge MGKFilterMenuItem*)_user_data;
 
  const auto processed = [menu_item processInterceptedEvent:_event];
 
  if( processed )
    return noErr;
  else
    return CallNextEventHandler( _handler, _event );
}

It’s possible to convert EventRef into an NSEvent object with the following initializer: [NSEvent eventWithEventRef:]. Once NSEvent is received, any appropriate handling can be applied. In the current implementation, the top menu item contains an NSTextField view with a search criteria, which is shown only when some filter was entered. After a string inside this text field is updated, control is handed to the menu object so it can hide or show matching items, this process is quite straightforward. There are some details worth mentioning here:

  • It’s quite convenient to automatically select the first matching menu item after applying a filter if there was no selection before. NSMenu does not provide such interface, but it can be added with another dirty hack:
- (void) higlightCustomItem:(NSMenuItem*)_item
{
  static const auto selHighlightItem = NSSelectorFromString(@"highlightItem:");
  static const auto hack_works = (bool)[self respondsToSelector:selHighlightItem];
  if( hack_works ) {
#pragma clang diagnostic push
#pragma clang diagnostic ignored "-Warc-performSelector-leaks"
    [self performSelector:selHighlightItem withObject:_item];
#pragma clang diagnostic pop
  }
}


  • After a filter was applied, any previously set key equivalents must be cleared and vice versa. Otherwise, they can be unintentionally triggered instead of altering criteria for filtering.
  • These hacks are quite dirty and basically, nothing guarantees that they won’t stop working at any moment in the future. If (or when) an underlying NSMenu’s infrastructure will change radically, MGKMenuWithFilter will gracefully fall back to a regular menu behavior. At this moment, however, this infrastructure seems to be pretty stable and hasn’t got major changes for years.
    Current hack compatibility at the moment:
    macOS 10.12 “Sierra” – works
    OS X 10.11 “El Capitan” – works
    OS X 10.10 “Yosemite” – works
    OS X 10.9 “Mavericks” – works
    OS X 10.8 “Mountain Lion” – works
    Mac OS X 10.7 “Lion” – works partially, there’s no [NSMenu highlightItem:]
  • Current implementation assumes a programmatic approach of populating a menu, but with minor changes, it can be extended to support NIB-based menus made in Interface Builder as well.

The source code is available in this repository.
It also includes example projects written in Swift, Objective-C and a project in Objective-C for pre-Yosemite versions of MacOSX.