For many years, the terminal emulator in Nimble Commander had a pesky bug. The only obvious place where it manifested itself was a particular integration test, and that test managed to be flaky only when running in CI on GitHub. Somehow, I was never able to reproduce the problem locally, despite trying many times and poking the system from different angles. In the end, I gave up and slapped that test with “[!mayfail]”.
The test in question opened multiple command-line shells and performed very basic operations with them one by one, simply verifying that the terminal buffers eventually reached their expected states. Here’s the source code of that test. This test had me scratching my head for years, filling the CI output with detailed logs that showed no errors. Everything worked “correctly”, but no matter how large the timeouts were, the shells never reached the proper state.
Recently, out of sheer curiosity, I tried feeding this problem to an LLM to see what would happen. It went through many rounds, most of which led to dead ends, for example, proclaiming things like: “The test ‘Test multiple shells in parallel via output’ fails in CI because of slow bash startup caused by ~/.bashrc sourcing on the GitHub Actions macOS runner.”. These “fixes” often sounded plausible, but they didn’t change the actual behaviour – the test still failed. One round, however, the LLM managed to spot an oddity in the logs which I’d been missing all these years because it looked completely innocent.
The logs were filled with boring information that looked like this:
[ShellTask.cpp:290] Starting a new shell: /bin/bash[ShellTask.cpp:293] Initial work directory: /private/var/folders/p8/qyz0lmpd2mld64f_f4c66y4c0000gn/T/_nc__term__test_/[ShellTask.cpp:297] Environment:[ShellTask.cpp:299] LANG = en_US.UTF-8[ShellTask.cpp:299] LC_COLLATE = en_US.UTF-8[ShellTask.cpp:299] LC_CTYPE = en_US.UTF-8[ShellTask.cpp:299] LC_MESSAGES = en_US.UTF-8[ShellTask.cpp:299] LC_MONETARY = en_US.UTF-8[ShellTask.cpp:299] LC_NUMERIC = en_US.UTF-8[ShellTask.cpp:299] LC_TIME = en_US.UTF-8[ShellTask.cpp:299] TERM = xterm-256color[ShellTask.cpp:299] TERM_PROGRAM = Nimble_Commander[ShellTask.cpp:307] posix_openpt(O_RDWR) returned 28 (master_fd)[ShellTask.cpp:330] ptsname: /dev/ttys009[ShellTask.cpp:338] slave_fd: 31[ShellTask.cpp:397] cwd_pipe: 32, 34[ShellTask.cpp:398] semaphore_pipe: 35, 36[ShellTask.cpp:408] fork() returned 73394[ShellTask.cpp:463] prompt_setup: PROMPT_COMMAND='if [ $$ -eq 73394 ]; then pwd>&20; read sema <&21; fi'[ShellTask.cpp:607] pwd prompt from shell_pid=73394: /private/var/folders/p8/qyz0lmpd2mld64f_f4c66y4c0000gn/T/_nc__term__test_/
At this point, it’s worth briefly describing how Nimble Commander internally runs command-line shells. When the terminal emulator opens a new shell, it roughly goes through these steps:
prepare the environment (variables, working directory)
open and configure a pseudo-terminal (posix_openpt(), grantpt(), unlockpt(), ptsname(), open())
open two pipes that will be used by the prompt command to report the current working directory
fork() the process
the master continues setting up state in Nimble Commander itself
the slave continues configuring the shell process:
remaps the communication pipes to specific FDs: 20 and 21 (because reasons).
closes all file handles except [0, 1, 2, 20, 21].
finally performs execv() to become the shell program requested by the user.
These file descriptors, #20 and #21, allow basic communication between the shell and Nimble Commander. Whenever a user executes “cd /some/directory” in the shell, the associated file panel is expected to pick up the working-directory change and display that path as well. The reporting mechanism is pretty simple under the hood: the shell environment is pre-filled with a variable PROMPT_COMMAND, which contains a command executed each time Bash is about to display a prompt.
The command injected by Nimble Commander looks like this (for Bash; other shells have similar machinery):
if [ $$-eq73394 ]; thenpwd>&20; readsema<&21; fi
Translated for humans, this means:
If I am the specific process, i.e. the root process of this shell task, then:
    Print the current working directory path to file descriptor #20
    Wait until something can be read from file descriptor #21
FD 20 points to the write end of the pipe that transmits the working directory. FD 21 points to the read end of the “semaphore” pipe. Reading from the semaphore pipe provides a basic synchronization mechanism with Nimble Commander – it writes into that pipe to acknowledge that the CWD path has been received.
Now, when a POSIX pipe is opened via pipe(), the file descriptors it creates can have basically any value that happens to be the lowest available number. So how are they remapped to the fixed numbers 20 and 21? dup2(int oldfd, int newfd) is at your service, this function does exactly that. There are a few different cases that dup2() can handle:
if oldfd == newfd, the call is a no-op.
if newfd is unused, it is opened as a duplicate of oldfd.
if newfd is a valid descriptor, it’s closed and reopened as a duplicate of oldfd.
Since all but a few “blessed” FDs are closed before starting the shell program, no explicit closure of the original file descriptors is needed. In case of any error, the child process exits immediately, so if execution continues, it is guaranteed that #20 and #21 are valid file descriptors.
Can you spot the bug?
This code works perfectly well, until the stars align and it no longer does. Here’s a piece of the logs showing the conditions under which this remapping scheme spectacularly breaks down:
The first dup2() is asked to duplicate #19 as #20. But #20 is already in use – it’s the read end of the semaphore pipe! So dup2() silently closes the only existing descriptor for the semaphore pipe’s read end and reopens it as the write end of the CWD pipe. The second call to dup2() then duplicates that same CWD write descriptor to what was supposed to become the semaphore read descriptor!
So instead of this: #20 – write CWD #21 – read Sema
the shell process ends up with this: #20 – write CWD #21 – write CWD
And once the shell process executes the prompt command, it tries to read from the write end of the pipe and deadlocks forever.
Normally, the file descriptors would have much higher values, so they wouldn’t clobber each other. In this particular test, however, the process had a very pristine state and allocated file descriptors starting from very low numbers. Gradually opening multiple shells one by one, it eventually stepped on its own toes:
While working on my toy software rasterizer, at some point I decided to try rendering a skybox using cube maps. Loading and drawing a pre-existing environment cube map as 12 triangles proved to be easy and boring. Next, I looked into generating the skybox programmatically on the fly during each frame. The first attempt used the Preetham daylight model. It worked, but I couldn’t tune it well enough to produce good-looking results for a dynamic sky with the Sun moving in real time from dawn till dusk. This paper explores the issues well: “A Critical Review of the Preetham Skylight Model”. Next attempt used the Hosek-Wilkie sky model (paper, presentation), which produced much more convincing results.
This model allows sampling sky radiance to build an image like this:
When combined with a visualization of a moving Sun and rendered for five cube-map faces each frame, it results in a lively sky background like this:
This video shows the Skybox example from the NIH2 software renderer, which runs at ~150 FPS at 720p on an Apple M1 CPU.
This blogpost summarizes the experience of running the Hosek-Wilkie sky model on the CPU and iteratively optimizing the implementation enough for semi real-time use cases. It also provides a distilled version of the source code detached from the software renderer. The code is written in Rust, but this doesn’t matter much, as the logic behind the optimizations is equally applicable to any compiled language.
For simplicity, the implementation builds only a single cube-map face (negative Z). Since the sky model is defined only for Sun directions with Y>=0, only the top half of this face is filled. Extending the logic for other faces is pretty straightforward, but makes the code hairier, so they were omitted.
The optimizations focus on single-threaded performance, as building multiple faces can be trivially parallelized across threads. A resolution of 1024×512 was chosen for benchmarking each iteration of the code, measurements were done on the base Apple M1 CPU.
Per entire sky dome (during model initialization):
Turbidity [1..10] – measure of aerosol content in the air
Ground albedo [0..1 x 3] – fraction of sunlight reflected by the ground
Solar elevation [0°..90°] – how high the Sun is
Per view direction (during sampling):
Theta θ [0°..90°] – view angle from the zenith
Gamma γ [0°..180°] – angle between the view direction and the Sun
Conceptually, building a single cube-map face consists of the following steps:
Initialize the sky model (can be shared across faces)
For each pixel on the face:
Compute θ and γ
Sample the model with (θ, γ) three times (once per RGB channel)
Tone-map, convert to sRGB, and write out as U8 x 3
Sky model initialization is performed once per frame and is very cheap. It mainly consists of evaluating equation (11) a few times on the table data and lerping between the results.
θ and γ are computed from pixel coordinates (x, y) as follows:
let u:f32=2.0* (x asf32+0.5) / (width asf32) -1.0; // [-1, 1] let v:f32= ((height -1- y) asf32+0.5) / (height asf32); // [0, 1]let dir:Vec3=Vec3::new(u, v, -1.0).normalize(); // ZNeg => Z=-1let theta:f32= dir.y.acos(); // view angle from zenithlet cos_gamma:f32= dir.dot(sun_direction);let gamma:f32= cos_gamma.acos(); // angle between view direction and sun
Sampling the model is done by implementing the equations (8, 9) directly:
pubfnf(&self, theta:f32, gamma:f32) -> (f32, f32, f32) {let chi =|g:f32, a:f32|->f32 {let num:f32=1.0+ a.cos().powi(2);let denom:f32= (1.0+ g.powi(2) -2.0* g * a.cos()).powf(3.0/2.0); num / denom };let eval =|p: [f32; 9], theta:f32, gamma:f32|->f32 {let a:f32= p[0]; // ...let i:f32= p[8];let term1:f32=1.0+ a * (b / (theta.cos() +0.01)).exp();let term2:f32= c + d * (e * gamma).exp() + f * gamma.cos().powi(2) + g *chi(i, gamma) + h * theta.cos().sqrt(); term1 * term2 };let f0:f32=eval(self.distribution[0], theta, gamma);let f1:f32=eval(self.distribution[1], theta, gamma);let f2:f32=eval(self.distribution[2], theta, gamma); (f0 *self.radiance[0], f1 *self.radiance[1], f2 *self.radiance[2])}
For tone mapping I used Reinhard since it’s simple and robust. Gamma correction and clamping are applied before writing out a pixel:
The amount of work the poor old scalar CPU has to perform per pixel is no joke. Worse still, compilers (including rustc) are constrained by strict IEEE floating-point semantics, which prevents many otherwise valid optimizations. However, it is possible to manually simplify parts of the formulas and hoist redundant computations:
cos(θ) and cos(γ) are already available, there’s no need to re-calculate them again inside the function body
v.powf(3.0 / 2.0) is mathematically equivalent to v * v.sqrt(), which is much cheaper
v.powi(2) is equivalent to v * v, in case the compiler fails to expand it
Result: these simple transformations reduce the compute time down to ~28ms.
let f0:f32=eval(self.distribution[0]);let f1:f32=eval(self.distribution[1]);let f2:f32=eval(self.distribution[2]);
… eventually raises the question – since we’re doing the same computation three times, just with different input data, why not do all three in parallel?
Of course, there are no SIMD registers with three lanes, but nothing prevents from using a fourth throwaway lane for free. Effectively, running the formulas (8, 9) for RGBX, where the distribution and radiance values for the fourth lane are zeroed out.
A direct translation of the sampling function to 4-way SIMD looks like this:
pubfnf(&self, theta:f32, gamma:f32, theta_cos:f32, gamma_cos:f32) -> (f32, f32, f32) {let a:F32x4=F32x4::load(self.distribution4[0]);...let i:F32x4=F32x4::load(self.distribution4[8]);let one:F32x4=F32x4::splat(1.0);let two:F32x4=F32x4::splat(2.0);let zero_zero_one:F32x4=F32x4::splat(0.01);let gamma:F32x4=F32x4::splat(gamma);let theta_cos:F32x4=F32x4::splat(theta_cos);let gamma_cos:F32x4=F32x4::splat(gamma_cos);let radiance:F32x4=F32x4::load(self.radiance4);let term1:F32x4= (b / (theta_cos + zero_zero_one)).exp() * a + one;let chi_num:F32x4= one + gamma_cos * gamma_cos;let chi_denom:F32x4= one + i * (i - gamma_cos * two);let chi:F32x4= chi_num / (chi_denom * chi_denom.sqrt());let term2:F32x4= c + d * (e * gamma).exp() + f * gamma_cos * gamma_cos + g * chi + h * theta_cos.sqrt();let c:F32x4= (term1 * term2) * radiance;let c4: [f32; 4] = c.store(); (c4[0], c4[1], c4[2])}
Here I use a custom F32x4 SIMD type that provides trig and pow/exp/log operations, but really any decent SIMD library would do. I’m mostly using ARM64, but also want the code to run on AMD64, so a 4-wide type is the common denominator.
Result: this version takes the previous ~28ms down to ~26ms. Meh, rather underwhelming. It clearly demonstrates a well-known truth – effective SIMD requires rethinking both data layout and function interfaces. Otherwise, the ceremony of setting up SIMD computation and getting the results back nullifies any gains from the parallel compute.
The next step was to go into full SIMD. Drop the per-pixel approach entirely and instead perform the computation per rows, separately for the R, G, and B channels. With width=1024, this means first writing out (cos(θ), γ, cos(γ)) for the entire row (1024 x 3 x 4b = 12Kb), and then calculating the formulas (8, 9) from the paper and writing them into three output arrays (1024 x 3 x 4b = 12Kb). Since the size of the scratchpad arrays is about 24Kb, the CPU should rarely touch memory outside the L1 cache:
The function interface changes accordingly – it now accepts spans of input arrays and a span of an output array. The internal logic remains the same, but it operates on chunks of 4 input values, passing them through the transformation and writing out 4 results per iteration:
fnf_simd_channel<constCHANNEL:usize>(&self, gamma:&[f32], theta_cos:&[f32], gamma_cos:&[f32], output:&mut [f32]) {let gamma:*constf32= gamma.as_ptr();let theta_cos:*constf32= theta_cos.as_ptr();let gamma_cos:*constf32= gamma_cos.as_ptr();let output:*mutf32= output.as_mut_ptr();let a:F32x4=F32x4::splat(self.distribution[CHANNEL][0]); // ...let i:F32x4=F32x4::splat(self.distribution[CHANNEL][8]);let one:F32x4=F32x4::splat(1.0);let two:F32x4=F32x4::splat(2.0);let zero_zero_one:F32x4=F32x4::splat(0.01);let radiance:F32x4=F32x4::splat(self.radiance[CHANNEL]);for idx in (0..=len -4).step_by(4) {let gamma:F32x4=F32x4::load(unsafe {*(gamma.add(idx) as*const [f32; 4])});let theta_cos:F32x4=F32x4::load(unsafe {*(theta_cos.add(idx) as*const [f32; 4])});let gamma_cos:F32x4=F32x4::load(unsafe {*(gamma_cos.add(idx) as*const [f32; 4])});let term1:F32x4= (b / (theta_cos + zero_zero_one)).exp() * a + one;let chi_num:F32x4= one + gamma_cos * gamma_cos;let chi_denom:F32x4= one + i * (i - gamma_cos * two);let chi:F32x4= chi_num / (chi_denom * chi_denom.sqrt());let term2:F32x4= c + d * (e * gamma).exp() + f * gamma_cos * gamma_cos + g * chi + h * theta_cos.sqrt();let c:F32x4= (term1 * term2) * radiance; c.store_to(unsafe { &mut*(output.add(idx) as*mut [f32; 4]) }); }}
Result: this data-layout transformation cuts the runtime from ~26ms to ~13ms. In other words, it is twice as fast while conceptually doing more work in the process, since inputs and outputs are first written to scratch arrays instead of being consumed immediately one by one.
Now that the implementation operates in SIMD intrinsics, it becomes possible to save a few more instructions by using fused multiply-add (FMA) where applicable. The assembly listing also showed some unnecessary checks around loop iteration and pointer arithmetic; this can be fixed by re-writing the code to be as primitive as possible:
With these changes, the core of the implementation turns into a large loop with one conditional jump. The assembly output becomes a wall of branchless 4-wide vector operations, beautiful!
Result: these tweaks shave off another ~1ms from the runtime, bringing it down to ~12ms.
At this point there are no more low-hanging fruits in the Hosek-Wilkie sky sampling itself; the scaffolding around it became the bottleneck instead. The calculation of theta and gamma, while not super expensive, can still be accelerated by deriving 4 triplets at a time. Instead of recalculating (u, v) from (x, y) per-pixel, the initial direction vector and the dX/dY stepping constants are computed once. Next, updating the direction component, while stepping through 4 values, is then done via a single add instruction:
for x in (0..width).step_by(4) { // normalize the components of the direction vectorlet recip_len_sqrt:F32x4= vec_x_4.fma(vec_x_4, vec_y2_z2_4).rsqrt();let normalized_vec_x_4:F32x4= vec_x_4 * recip_len_sqrt;let normalized_vec_y_4:F32x4= vec_y_4 * recip_len_sqrt;let normalized_vec_z_4:F32x4= vec_z_4 * recip_len_sqrt; // cos(theta) - cos(angle between the zenith and the view direction)let theta_cos_4:F32x4= normalized_vec_y_4; // gamma_cos = dot(dir, sun_dir).clamp(-1.0, 1.0);let gamma_cos_4:F32x4= (normalized_vec_x_4 * sun_dir_x_4+ normalized_vec_y_4 * sun_dir_y_4+ normalized_vec_z_4 * sun_dir_z_4).min(F32x4::splat(1.0)).max(F32x4::splat(-1.0)); // gamma - angle between the view direction and the Sunlet gamma_4:F32x4= gamma_cos_4.acos(); theta_cos_4.store_to(unsafe {&mut*(theta_cos_row.as_mut_ptr().add(x) as*mut [f32; 4])}); gamma_cos_4.store_to(unsafe {&mut*(gamma_cos_row.as_mut_ptr().add(x) as*mut [f32; 4])}); gamma_4.store_to(unsafe {&mut*(gamma_row.as_mut_ptr().add(x) as*mut [f32; 4])}); vec_x_4 += dir_dx_x_4; // step the direction vector forward by 4 texels}
Result: calculating four (cos(θ), γ, cos(γ)) triplets at a time removes another ~1ms, now at ~11ms. Likely this part can be optimized a bit further, but it already feels like a territory of diminishing returns.
The only scalar part left is processing the HDR output from the Hosek-Wilkie sky model. This stage also needs to be re-written to take 3 per-component arrays and produce a single SDR RGB array. The operation is somewhat awkward – the input data are laid out per component (RRRR… GGGG… BBBB…), while the output must be interleaved per pixel (rgbrgbrgbrgb…). Still, with the help of a few useful ARM64 instructions and LLVM’s excellent backend optimizer, the result is surprisingly good.
Another important ingredient in making this fast is CHEATING:
For skybox rendering, the sRGB transfer function can be simplified to a power function powf(1.0/2.2) without visually noticeable difference
powf(1.0/2.2) is close enough to powf(1.0/2.0), which is just sqrt(), i.e. a single CPU instruction, voila!
It is also convenient to inject a bit of noise into this post-processing stage to reduce visible banding (before and after debanding):
The combined and SIMDified version of post-processing looks like this:
Again, the main loop becomes a branchless wall of 4-wide vector operations.
Result: this change pushes the time down to ~4ms. At this point, the Hosek-Wilkie skybox can be regenerated comfortably every frame, allowing smooth real-time Sun movement.
Summary
Overall optimization progress from version to version is summarized in the table below:
Initial version
~46ms
Less wasteful computation
~28ms
Per-pixel SIMD
~26ms
Per-row SIMD
~13ms
FMA and raw ptr arithmetic
~12ms
(cos(θ), γ, cos(γ)) in SIMD
~11ms
Post-processing in SIMD
~4ms
A back-of-the-envelope calculation gives an average wall time of ~8ns to produce each pixel. Considering how much math is being squeezed into these 8 nanoseconds, it’s almost miraculous what modern CPU cores can sustain. Even if my base M1 MacBook is now five years old, it feels that well-written software can run astronomically fast on these machines.
Of course, it’s also tempting to ask: why not just throw a dozen teraflops of GPU compute at this embarrassingly parallel problem and call it a day? Yep, for any practical setting, that likely should be the default approach. But for recreational and educational programming, where’s fun and challenge in that?
This year I took a pause from developing Nimble Commander; during that time, I had some fun with software rendering – it’s actually quite enjoyable when you get fast feedback from your code on the screen and you’re not burdened by a sizeable codebase.
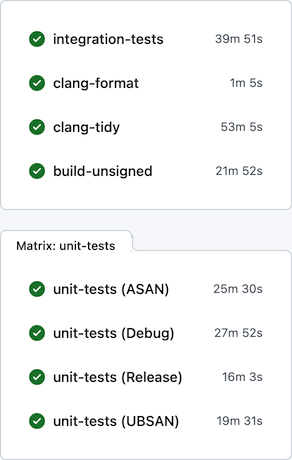
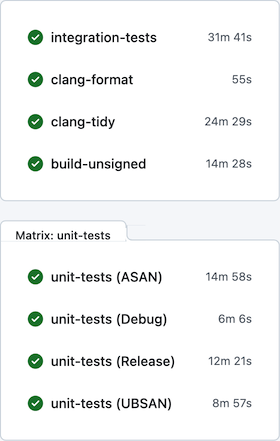
Upon getting back to NC, one thing I realized was that I can’t tolerate the very slow development feedback cycle anymore. On a local machine, build times were tolerable – e.g., on the base M1 CPU the project could be built from scratch in ~5 minutes. On GitHub Actions, however, the situation was rather miserable: the feedback time was somewhere between 30 and 60 minutes, depending on luck:
Generally, I find macOS to be a rather hostile platform for developers (but amazing for users), where just keeping up to date with the constant streak of changes requires a lot of effort. Multiplied by other oddities of the ecosystem, maintenance becomes rather tedious. For example, the “clang-tidy” CI job has to first build all targets via xcodebuild, eavesdropping on the compiler invocations, manually clean the Xcode-specific arguments, and only after all that acrobatics actually execute clang-tidy. Another example of the oddities that make the CI so slow: the “integration-tests” job has to run its Docker containers backed by full QEMU emulation (sloooow), since Apple Silicon didn’t allow nested virtualization up until M3 which is still unavailable on GitHub’s runners.
Previously I tried using a combination of xcodebuild + ccache + GitHub Actions / Jenkins to improve the CI turnaround time, with limited success, and ended up dropping this caching altogether. Microsoft is very generous in giving unlimited free machine time on three platforms to Open-Source projects, which I guess somewhat disincentives optimizing resource usage. Seriously though, thank you, Microsoft! Being able to build/package/test/lint/analyze per each commit on real Mac hardware is absolutely amazing. It’s hilarious that in developing Nimble Commander – an application that targets solely macOS – I’m getting support from Microsoft instead of Apple, but I digress…
This time I focused on two other areas in an attempt to improve the CI turnaround time: minimizing xcodebuild invocations and using unity builds.
Less xcodebuild invocations
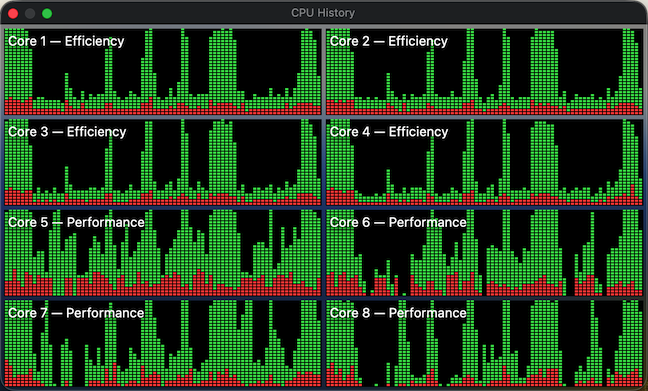
Previously, the scripts that run tests (e.g. “run_all_unit_tests.sh”) tried to do the “right thing”. Targets of the test suites can be identified by their name suffixes (e.g. “UT” for unit tests and “IT” for integration tests), so the scripts asked the build system to provide a list of targets, filtered the list to what they needed, then built those targets one by one and finally ran them. This approach isn’t the most efficient, as it sometimes leaves the build system without enough work to do in parallel. To visualize, here’s how the CPU load previously looked sometimes:
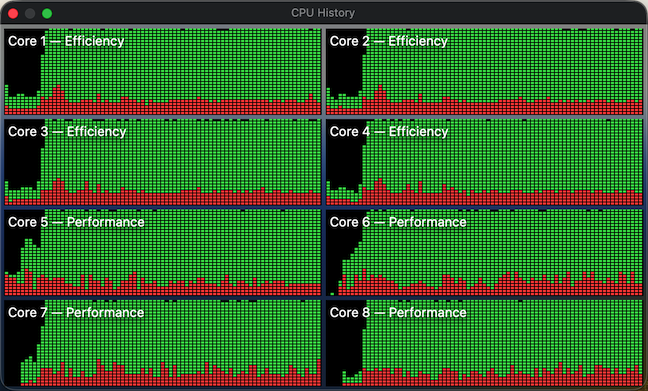
The periods of low CPU usage represent the time when either the build system isn’t running yet or already has fewer targets than available CPU cores to work on in parallel. To improve system utilization, I dropped this “smart” approach and instead manually created explicit “umbrella” schemes that pull in a set of targets, e.g. “All”, “UnitTests” and “IntegrationTests”. Now the CI scripts effectively perform only two invocations of the build system – one to gather the build paths and another to fire up the actual build. In this setup, xcodebuild is able to construct a full build graph that includes every target and load up all CPU cores very efficiently (make sure to pass “-parallelizeTargets”):
Moral of the story? Whenever you try to do the “right” / ”smart” thing, at least verify with perf tools that this smartness doesn’t backfire.
Unity builds
Unity builds are a nice tool that shouldn’t have existed in the first place. Traditionally, they served two purposes: allowing the compiler to optimize better by accessing more context, and speeding up compilation by doing fewer redundant passes. The prior is largely irrelevant today, as we have LTO/WPO working well across all major compilers. For example, Nimble Commander is built as a large monolithic blob where both 1st- and 3rd- party source is statically linked together with link-time optimization. Unity builds, though, are still applicable. Not only are C++20 modules nowhere near production readiness, I doubt they will ever be applicable to NC, given the ample usage of Objective-C++ and occasional Swift interop. On top of that, compilation of C++ code gets slower and slower with each new Standard, simply due to the sheer size of the ever-expanding standard library code that the compiler has to go through over and over again.
Nimble Commander’s codebase consists of several libraries with well-defined boundaries and the main application, which is currently a rather intertwined monolith. I decided to take a pragmatic approach and move only the internal libraries to unity builds for now (that’s about 70% of the implementation files). Below are a few notes specific to applying unity builds in Nimble Commander and the most important – build times before and after.
Sources files were manually pulled into unity builds one by one. As there are two closely related but different languages in the codebase: C++ and Objective-C++, some of the libraries required two unity files: one “.cpp” and another “.mm”. On top of having two language flavors, the sources have to be built twice for two different architectures (x86_64 and arm64) when producing universal binaries. The final distribution of the sources over the unity build files looked like this:
Unity file
Number of included files
_Base.cpp
26
_Base.mm
2
_BaseUT.cpp
13
_Utility.cpp
25
_Utility.mm
34
_UtilityUT.cpp
11
_UtilityUT.mm
12
_Config.cpp
8
_Term.cpp
16
_Term.mm
7
_TermUT.cpp
7
_VFS.cpp
48
_VFS.mm
7
_VFSUT.cpp
9
_VFSIcon.cpp
3
_VFSIcon.mm
15
_Viewer.cpp
18
_Viewer.mm
12
_Highlighter.cpp
5
_ViewerUT.cpp
12
_Panel.cpp
8
_Panel.mm
15
_PanelUT.mm
8
_Operations.cpp
17
_Operations.mm
33
_OperationsUT.cpp
2
_OperationsUT.mm
3
_OperationsIT.cpp
7
Quite a lot of files required some touches:
In Objective-C++ files, localization based on NSLocalizedString() doesn’t work well with unity builds. Xcode’s automatic strings extraction tool stops processing these calls, seemingly only looking into source files directly compiled by the build system. The solution was to move any calls to this magic function into a single file that’s not included in the unity build. It’s ugly but works.
Any static functions had to be either converted into static member functions or prefixed with a clarifying name. The same applies to static constants, type definitions, and type aliases.
Usages of “using namespace XYZ” had to be removed. That’s fine for “normal” C++, but for Objective-C++ it’s rough – Objective-C classes can’t be placed in C++ namespaces, so any references to types inside the same libraries have to be explicit. Inside methods, however, “using namespace XYZ” can still be used.
Any #defines or #pragmas have to scoped and reverted back.
In test suites, it was possible to cheat a bit and wrap the entire set of test cases in a unique namespace per file – it’s easier and less disruptive.
With these details out of the way, here’s a comparison of different build times, before and after switching to unity builds, measured on a base M1 CPU:
Before
After
Build the application itself, x86_64+arm64, Debug
320s
200s
Build the application itself, x86_64+arm64, Release
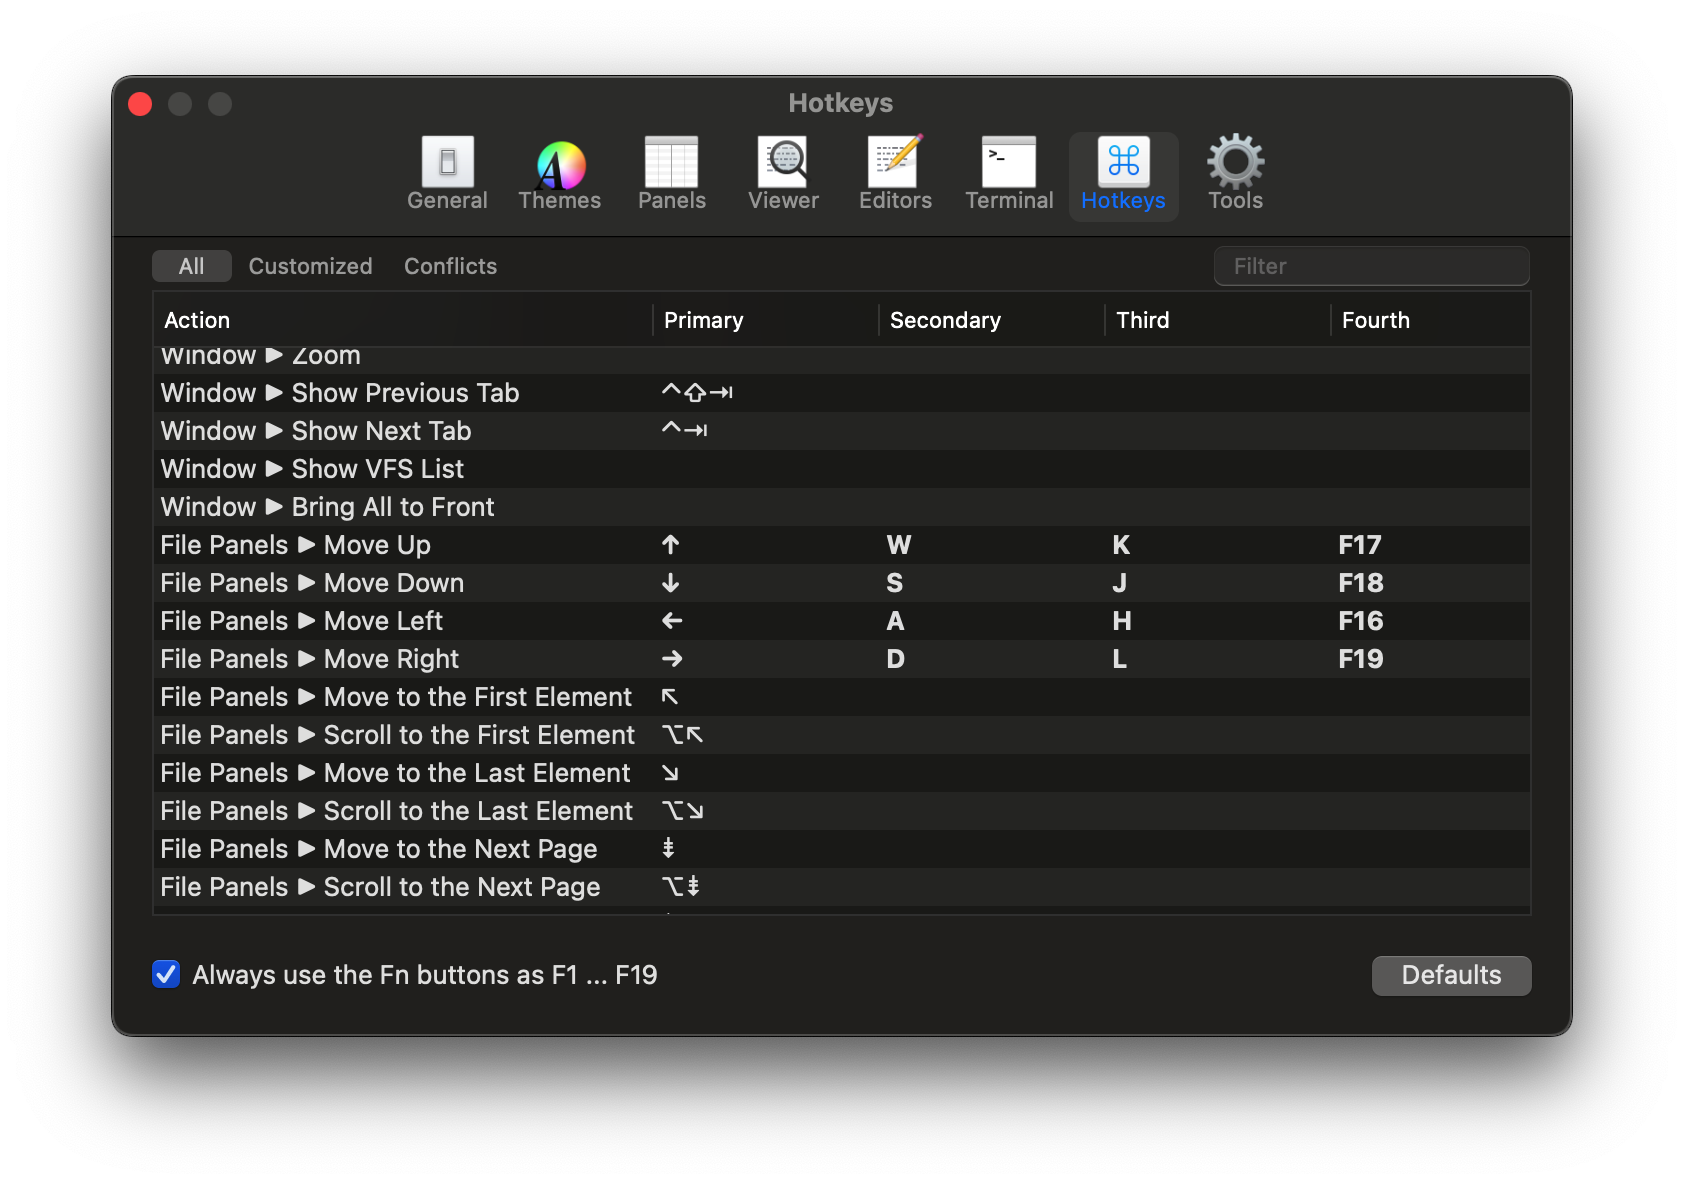
Over the New Year 2025 holiday period, I spent quite a few days implementing a feature in Nimble Commander that has been occasionally requested for many years. Customization of action shortcuts has been supported in the app since its early days, but this only allowed for a one-to-one relationship: an action could have a single shortcut.
What some users wanted was twofold:
The ability to set more than one shortcut per action.
The option to choose shortcuts that are normally not supported by macOS UX.
Adding this feature involved an interesting refactoring and touched many nitty-gritty details, so I thought it would be worth writing a brief reflection.
To start, let’s lay out the basics of how Nimble Commander handled shortcuts before.
Shortcuts can be assigned to three distinct types of actions, even though on the surface they appear similar:
Actions available through the standard fixed set of menu items. Processing the keyboard events for these shortcuts is done by macOS frameworks. This approach is standard and expected by users, plus it’s somewhat self-documenting — the menu items display their key equivalents next to the labels. The downside, often surprising to users, is that the menu system enforces strict limitations on which keys or key combinations can work as shortcuts. For instance, assigning a single letter without modifiers as a shortcut isn’t possible.
Context-based custom actions. An example of these might be actions in the file panels. For instance, when the Down key is pressed, a particular view in the responder chain recognizes the keypress as corresponding to the panel.move_down action and triggers the appropriate event. This logic is custom and implemented in methods like performKeyEquivalent: or keyDown:. Nimble Commander has full control over these events, with no restrictions on key assignments.
External tools. Shortcuts can also be set for external tools. In this case, the macOS menu system handles the heavy lifting — the corresponding dynamic menu item is assigned the shortcut selected for the external tool. The difference from standard application menu actions is that the list of external tools can be modified while the application is running. However, the same restrictions as menu-based actions apply here.
There are two main components in Nimble Commander that provide the machinery for shortcut customization:
ActionShortcut. This class describes a single keystroke. In practical terms, it encapsulates a combination of a character from the BMP (2 bytes) and a bitmask of key modifiers (1 byte). The class is very compact, occupying just 4 bytes (2 bytes for the character, 1 byte for the modifier bitmask, and 1 byte for padding).
ActionsShortcutsManager. This class is responsible for tracking which actions are associated with which shortcuts, including both default settings and custom overrides. It also provides a mechanism to automatically update external instances of ActionShortcut whenever the shortcut assigned to a corresponding action changes.
At first glance, the feature seems to simply involve allowing multiple shortcuts per action instead of just one. However, a naive implementation would be too inefficient. The issue lies with how context-based shortcut processing is implemented.
Previously, the processing worked as follows: each view in the hierarchy (e.g., file panel views, split views, tabbed holders, main window states, etc.) maintained a set of ActionShortcuts corresponding to the actions it handled. Whenever a keyDown: event occurred, the view hierarchy was traversed, with each view being asked, “Are you interested in this keystroke?” until one of the views responded affirmatively. Views supporting customizable shortcuts would then iterate through their set of shortcuts, asking each one, “Are you this keypress?“.
The runtime cost of this implementation scaled linearly with the number of customizable shortcuts. This was already somewhat inefficient, and converting each of these shortcuts into a dynamic container would have been completely impractical.
After staring at the code for a while, I realized the entire problem could be re-framed.
Instead of asking each shortcut, “Are you this keystroke?”, a new shortcut could be created directly from the keystroke itself. Once an incoming keystroke is expressed as a shortcut, it becomes possible to compare it directly with other shortcuts (a comparison of exactly 3 raw bytes).
Moreover, since shortcuts are just three bytes, they are trivially hashable, allowing all used shortcuts to be stored in a flat hash map. With such a map in place, it’s possible to perform an O(1) lookup for the incoming keystroke and answer the reverse question: “Which actions are triggered by this keystroke?”
This approach eliminates the need to maintain up-to-date, context-based shortcuts scattered throughout the UI code. Instead, the UI code can query the ActionsShortcutsManager to determine if the incoming keystroke corresponds to any specific action.
In practical terms, this functionality expansion involved:
Allowing the creation of an ActionShortcut from an NSEventTypeKeyDownNSEvent by adding a new constructor.